A writing plan is key if you want to write longer, more complex works or schedule writing time. It helps you keep track and visualize the stages of the writing process. Did you know you can use Plottr templates to create a detailed writing schedule? Keep reading to learn how with the Idea Folder Project Template, a three-step writing plan template.
What is the Idea Folder Writing Plan Template?
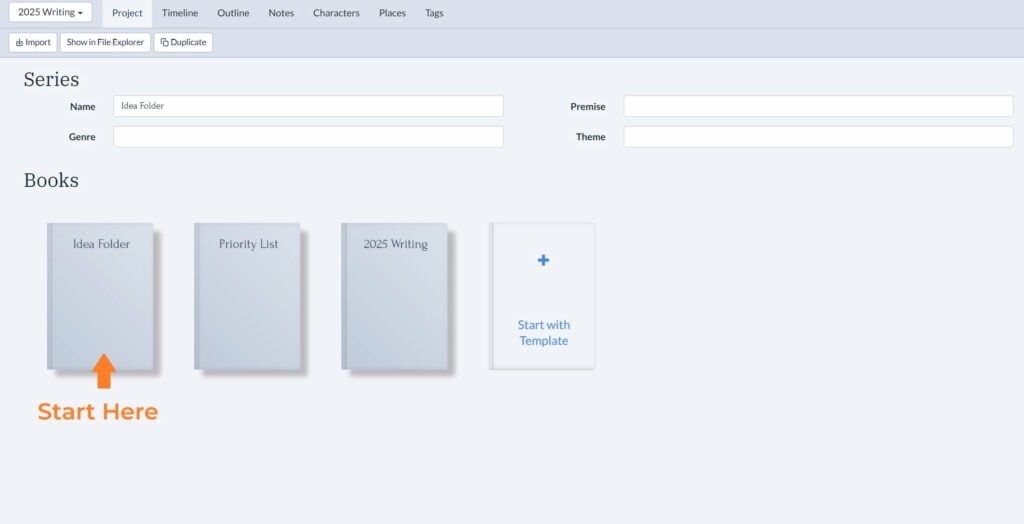
The “Idea Folder” project template in Plottr was developed out of a workshop on tracking the writing process. This writing plan template is divided into three “books” which you can see in the Project tab of Plottr:
- The Idea Folder: where you brainstorm ideas for projects, potential pen names and genres
- Priority List: where you move scene cards listing project ideas when you’re done brainstorming, and arrange ideas by priority
- 20XX Writing: where you plan out each stage of the writing process in an annual calendar
The process for using this writing plan template is simple. Move from left to right in the Project tab. Fill out each book’s timeline with as much detail as you need to begin.
Why Use This Writing Schedule Creator in Plottr?
Creating a writing plan may seem like an unorthodox use of Plottr.
We presented a session on using the Idea Folder for Daniel David Wallace’s Escape the Plot Forest 2024 summit. Some attendees were surprised to see Plottr used this way. Yet many Plottr fans use the software to visualize varied storytelling and planning processes. For example:
- Planning book promo
- Storyboarding podcast ideas
- Building YouTube content posting calendars
Using the Idea Folder Project Template in Plottr will help you:
Start Brainstorming Ideas for Writing (and Keep them Close)
The Idea Folder is a story brainstorming template that goes beyond just finding ideas. It helps you think about which ideas appeal to you more (or which the timing is right to pursue).
The best part? You have all your potential WIP brainstorming notes close at hand as you decide on priorities and create your calendar.
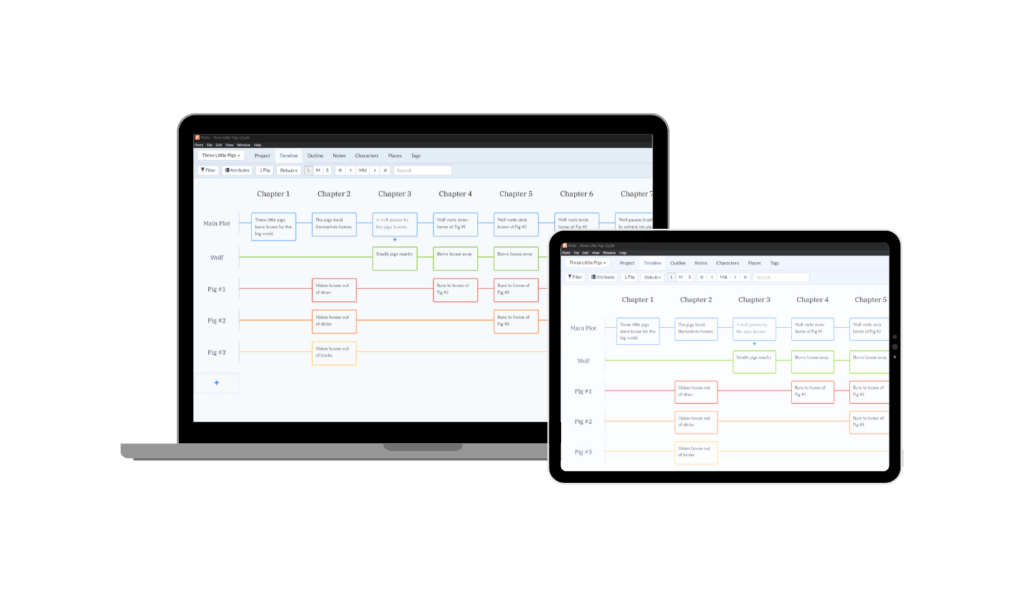
Visualize Your Schedule for Writing a Book Your Way
Another useful aspect of the Idea Folder Starter Template is you can tag, filter and color-code timelines and scene cards.
Let’s say you create a timeline for marketing tasks associated with your book colored royal blue. You can then filter your writing project tracking document in the Outline or Timeline tabs, to see only marketing-related tasks, with zero distraction.
Build Your Own Project Planning Bible
You can make so much more than a plan of writing tasks in Plottr.
Most of Plottr’s features are highly customizable. You could create notes in the Notes tab and add custom attributes such as “Email” or “Contact form URL.” These notes you could use to list people you could reach out to for author co-promo opportunities.
Since you can add links and images in Plottr, you can easily store all the information you need. Your writing progress tracker becomes a hub for managing every step of process, from ideation to publication.
Example Writing Schedule for Novel Planning
Let’s explore an example writing schedule for novel planning in Plottr.
Say you’re a first-time indie author and you’re planning out your writing calendar for the year ahead. Let’s say you’re thinking of writing cozy mystery books and sci-fi stories to submit.
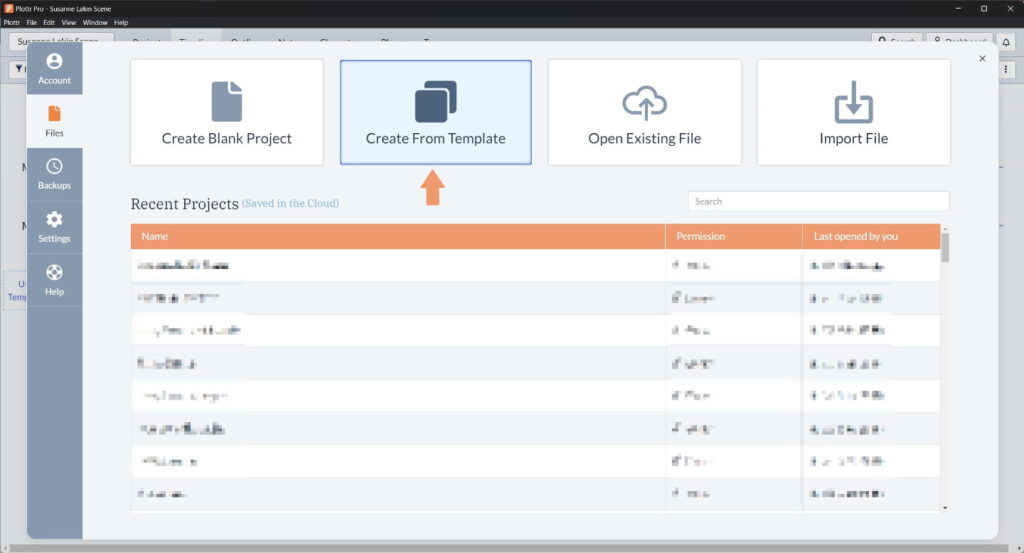
First, we’ll start a new project from the dashboard in Plottr, and choose “Idea Folder” under “Project Templates.”
Step 1: Brainstorm Project Ideas in Your Idea Folder
Once you’ve given your project a name and saved it, your new writing calendar opens in the Timeline tab. You see stage one of the process: the brainstorming phase.
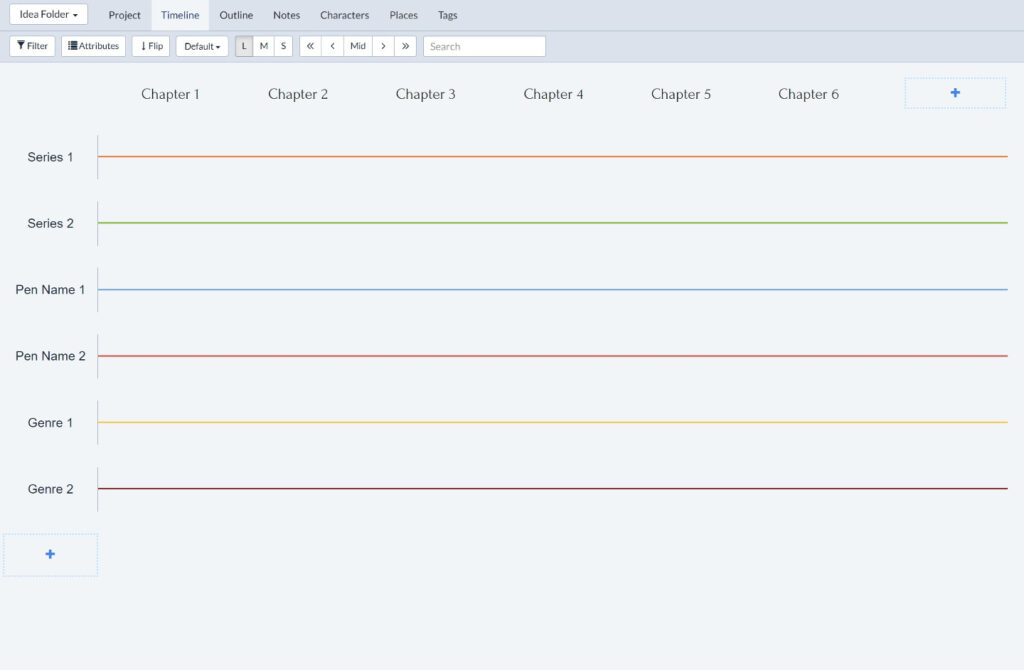
In the Idea Folder’s Timeline tab, you’ll see plotlines labeled:
- Series 1 and Series 2. You’ll create scene cards here for each story or book idea you want to pursue
- Pen Name 1 and Pen Name 2. You could brainstorm unique pen names for each genre you want to write. That way, you won’t risk confusing/losing a reader base in one genre when you pivot unexpectedly to another
- Genre 1 and Genre 2. This is where you can create scene cards to note which genre each idea falls within
Renaming Chapter Headers Via the Structure Button in Plottr
On the subject of columns, you can rename the top row of columns whatever you want.
Let’s rename our columns “Idea 1”, “Idea 2” and so forth since we’re brainstorming ideas here. To do that:
- Click the Structure button top-right (in Plottr for desktop).
- Under Name where it says “Chapter”, change that to “Idea”.
- Close the modal.
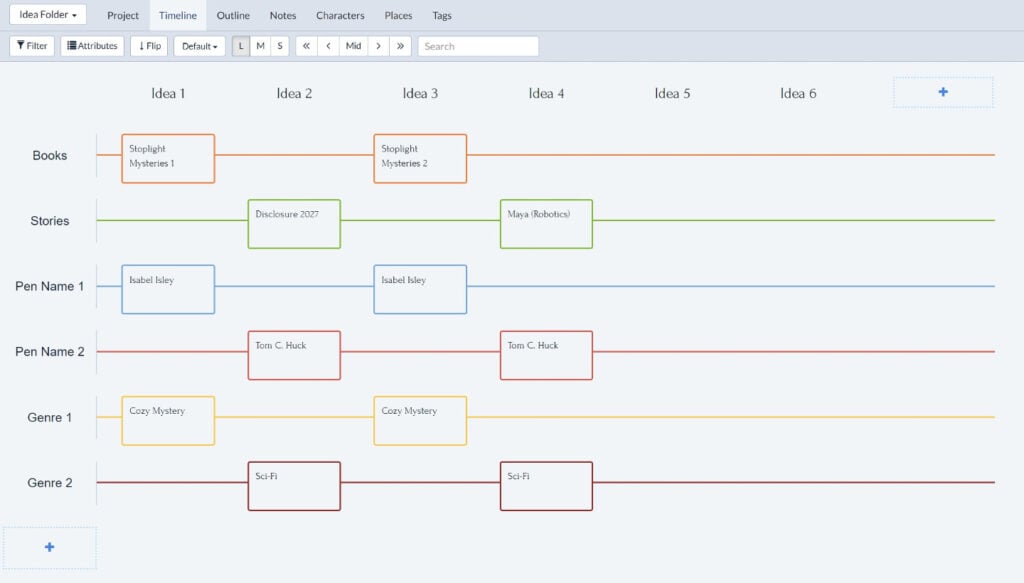
Now, your brainstorming page should have columns labeled “Idea” instead of “Chapter.”
Fleshing Out Your Idea Folder with Project Ideas, Pen Names and Genres
Let’s rename the first plotline “Books” and the second “Series” for this use-case. To do this, just click the name of the plotline to edit it, then click away to save your change.
Let’s give our cozy mystery series the placeholder name The Stoplight Mysteries since our setting is a town so small it only has one stoplight.
Then we’ve brainstormed two sci-fi ideas, “Disclosure 2027” and “Maya” (a story where we’ll focus thematically on robotics and a robot named Maya). We’ve made up pen names too (Isabel Isley for the cozy mystery and Tom C. Huck for the sci-fi).
Preparing Step 2 of Your Plan: Moving Cards Between Stages
A last step before you sort the ideas you’ve come up with into priorities is to move your cards from the “Idea Folder” book to the “Priority List” stage. To do this:
- Click a scene card to open it.
- Click the dropdown next to “Book” to open it and select “Priority List.”
- Your scene card will disappear from the timeline as it’s been moved to your Priority List.
Once you’ve done this for each scene card, your idea folder will be empty again, ready for new inspiration!
Step 2: Organizing Your Writing Project Priority List
Next, head back to the Project tab and open up the book labeled Priority List.
Now you’ll see a timeline with stacked scene cards that you moved from your Idea Folder. You can use the Structure button again to rename your columns “Priority 1,” “Priority 2,” etc.
Then, sort your project ideas into the relevant column, from highest priority at left, to lowest priority at right.
Move your pen name and genre cards to the dedicated rows for those elements, into their appropriate columns.
Prioritizing our cozy mystery idea, we get something like this:
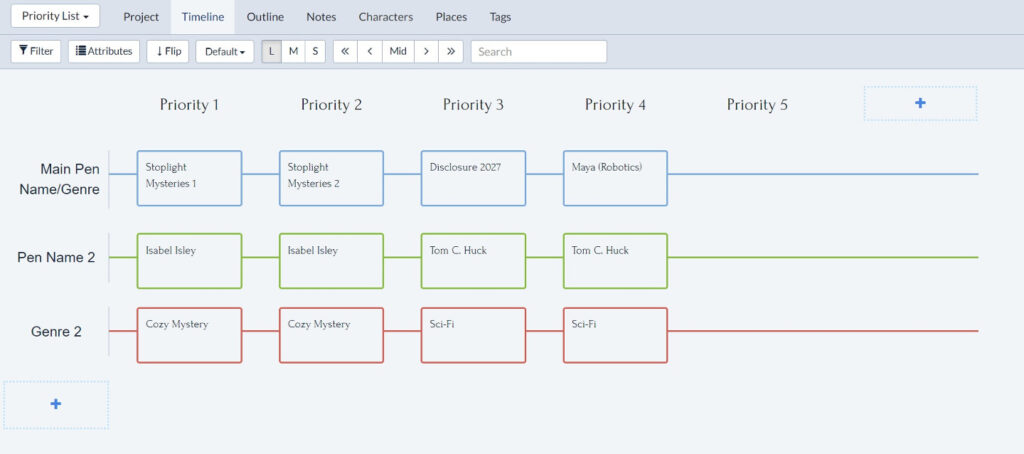
You can also change the top plotlines title from “Main Pen Name/Genre” to whatever you want. For example, “Title” if you’re putting title ideas in the top row.
Updating Your Priority List as You Complete Your Writing Schedule
As you complete each title in your priority list, you can delete its column. To do this, hover over the column heading and click the trash can icon, then confirm to delete.
This will make the next priority move left, one place higher in your priority list.
Step 3: Create Your Yearly Writing Plan
You’ve got your priorities sorted so now you’re ready to create a foolproof writing plan!
Head back to the Project tab and click the third, final book in the project. This is your writing calendar.
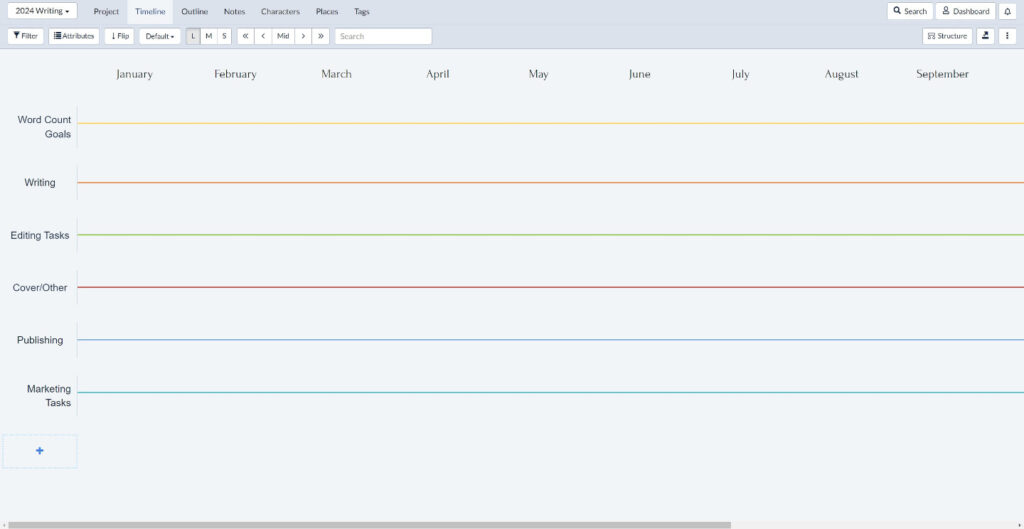
In the Timeline tab for this third step in the planning process, you’ll see calendar months as column headers. Then also the following plotline labels:
- Word Count Goals. Track the monthly word counts you plan to reach here!
- Writing. This is where you’ll visualize what section of your story you plan to write each month
- Editing Tasks. Here, you’ll plan which month you’ll devote to which editing tasks
- Cover/Other. This plotline leaves space to plan cover design and other pre-publication tasks (e.g. finding beta readers or sending ARCs to get early reviews)
- Publishing. If you’re a first-time author, you might fill this row with tasks to learn more about the publishing process
- Marketing Tasks. Here too, you might plan learning more about book promo and promotion strategies in tandem with writing
You can see from the above that an experienced author might use the template differently from a new author. Use it as a starting point to create the writing plan template you need.
Here’s are tips for filling out each row of your writing schedule:
Word Count Goals
Factor in already known commitments for the year ahead. Remember that you might not manage to write as much in months packed with weddings or work summits!
Think about the typical or average length of a book in your genre. Then you can chunk up each stage of the process into a manageable, SMART goal.
Writing
Planning to use a Plottr plot template as you draft? You could open a template (such as the Cozy Mystery Beat Sheet) on a new plotline in this view. You can always delete it later.
Look at that beat sheet as you fill out your monthly writing schedule. This will help you spread the crucial beats between months for a manageable workflow.
Editing Tasks
Are you someone who prefers editing as you go? Or do you prefer to draft to the end (or do several drafts) before you even entertain editing?
You might start the editing process further along in your writing plan. For example, editing what you wrote in January in February or even March. Remember to spread tasks out to avoid overwhelm.
Cover/Other
As you complete this row in this writing plan template, think about cover design in your genre. You could:
- Survey bestsellers in your genre from the past two to three years, and make notes on common or standout cover design elements in Plottr’s Notes tab, linking to inspiration sources
- Screenshot and save occasional inspirations directly within your Plottr writing schedule
Publishing
Now might be a good time to build a note in Plottr with links to good resources on publishing. That way, whenever you work on your plan, you can also easily look up useful publishing tips and resources.
Marketing Tasks
As you fill out this part of your writing schedule, think about:
- Who your future fans are. What social media pages do they follow? What kind of posts would they likely enjoy? Look at authors in your niche’s pages to see what type of content they post
- Where your future fans hang out. Use statistical resources to find where readers in your target audience hang out most. There are many guides to finding which social media platforms people use by age, gender and other details, such as this guide by Sprout Social
You can also use Plottr to plan your author newsletter.
Sample Writing Schedule in Plottr
For this example, we’re planning our cozy mystery idea from the Idea Folder. The typical cozy is around 60,000 words (shorter than other crime subgenres). Here’s an example plan accounting for that:
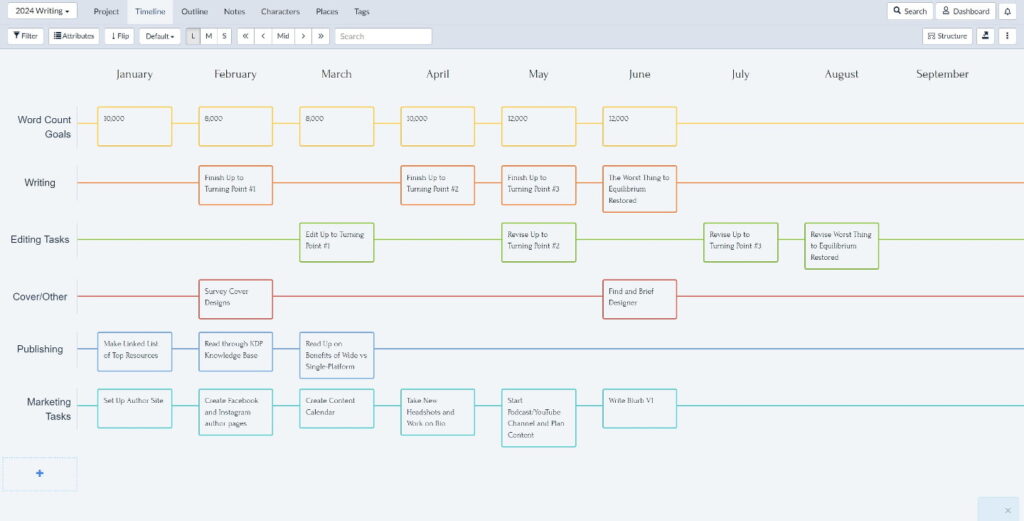
Your plan may look very different to the above! Still, it’s easy to see the benefit of being able to visualize each stage, from idea-finding to publication and after.
Pro tip: Use Plottr’s Plan View (released October 2024) to filter your book writing plan by stage of process even clearer and print your cards.
How to Get Started with the Idea Folder Project Template
Ready to plan out your process? First, install Plottr if you don’t have it already and make sure you either have an active Plottr plan or get started with free trial.
- Step 1: From the Dashboard in Plottr, click Create From Template
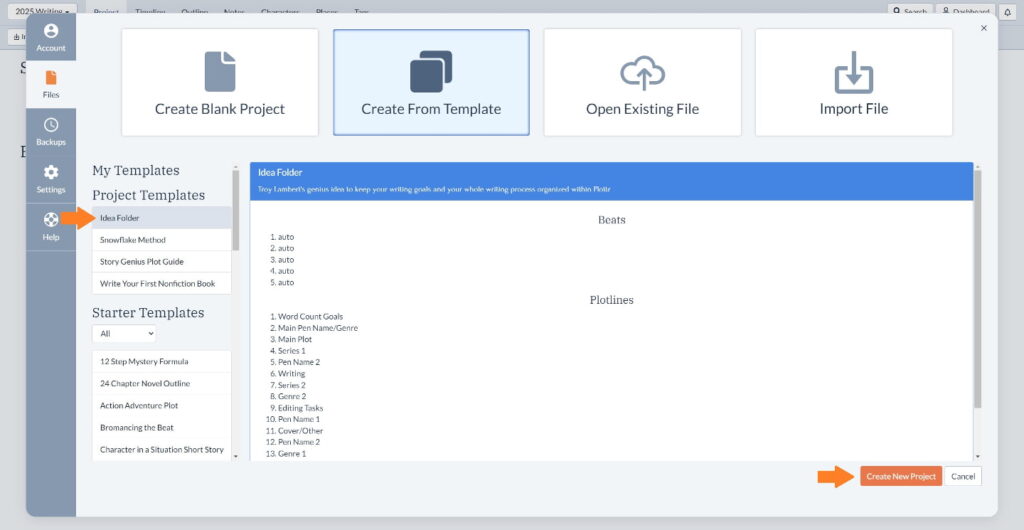
- Step 2: Under Project Templates, select Idea Folder, then click Create New Project bottom right
- Step 3: Your writing plan will open in the Timeline tab for the brainstorming phase
- Steps 4 through 6: Add ideas in scene cards to the timeline in the first section in the Project tab. Next, move your planning cards to the second “Book” when ready (the “Priority List”). Then start planning in the third “Book” in the Project tab
Pro tip: You can switch between these views any time from the Project tab. Planning isn’t always a linear process. You may want to review priorities or jot down further project ideas as you go.
Check out another project template guide on how to plan non-fiction using Plottr.
Ready to Create a Detailed Writing Plan?
Start planning in Plottr with a free trial. Create your writing calendar for next month or next year with the Idea Folder’s writing plan template and create success however you define it.

2 thoughts on “Writing Plan Template: Achieve Goals with a Clear Schedule”
Boy — this looks really complicated — more like a spread sheet for a major corporation — how can i be sure this will work for me? And this sounds like AI at work—are you using AI to plot my novel?
Rray77
Hey Rray77, thanks for reading our blog and sharing your feedback. It’s not nearly as complicated as you might think (out of 232 Plottr reviews on Capterra, Plottr users gave Plottr an average of 4.7 out of 5 for ease-of-use). You can decide whether it’ll work for you with our long 30-day free trial.
AI is not currently integrated into Plottr, and no AI was used in creating this guide. Let us know if you have any further questions!