The book Story Genius by Lisa Cron provides a detailed system and method for storytelling that is not based on a story structure but on characters and character arcs. The work begins long before you start writing a first draft.
This means this method can work for discovery writers or plotters. Each will approach the steps in this method a little differently, but the end result will be clarity about characters and drafts that are more consistent and have stronger story elements.
While this post and the Story Genius Project Template in Plottr both offer a good summary, we highly recommend that you read and study Story Genius if you plan to use this method as a guide. In the meantime, let’s take a closer look at the Story Genius method.
What Makes Up the Story Genius Method?
Unlike other plot structures in Plottr, the Story Genius method is made up of several parts and templates. There are five templates that work together in Plottr to make up the entire method:
- The Story Genius template (found in the Starter Templates section in Plottr) which this article is about
- The Story Genius Plot Problem Evaluation Template (a scene template)
- The Story Genius Plot Guide (found under Project Templates in Plottr)
- The Story Genius Scene Guide (another scene template)
- The Story Genius Character Template (a character template)
In this article, we will examine the Story Genius Project Template in more detail.
What is the Story Genius Project Template in Plottr?
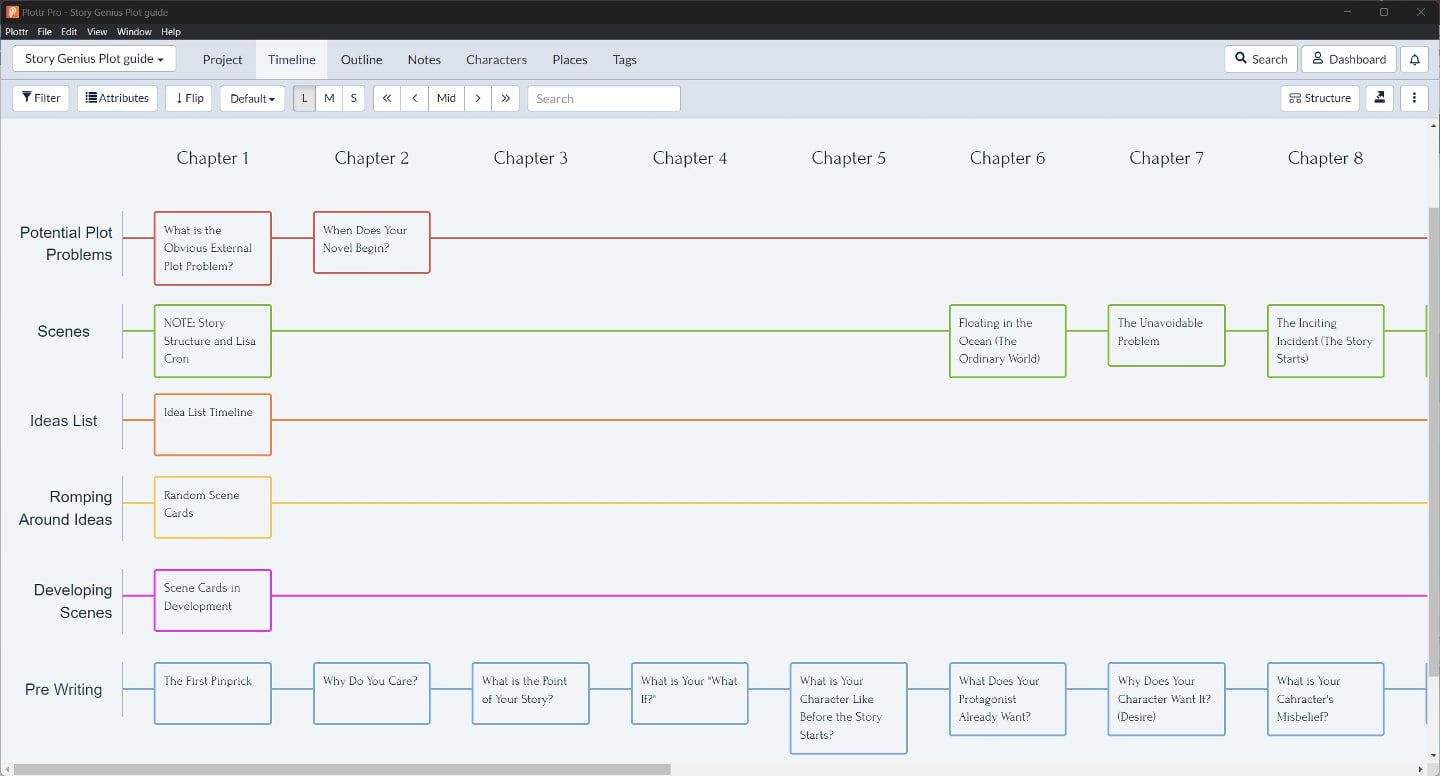
The Story Genius template builds on a lot of work done in the pre-writing stage. You can add it as a separate plotline to the Story Genius Plot Guide project template, as Troy Lambert explains in the video below, starting at 02:35:
This template is designed to help walk you through the pre-writing process.
There are sixteen steps, and a few will require you to put some information into other templates or even to write scenes (which you can do in Plottr or your favorite writing software).
Sound complex? It doesn’t have to be if you take things one step at a time.
Step 1: The First Pinprick
In this step, you’re going to look at when this initial story idea and the idea for your primary character came to you. This is important because it helps you understand what this story means to you and, therefore, what it will mean to the reader.
Ask yourself:
- Did the idea or the character come to you first?
- What about each of them grabbed your attention?
- The better you understand where your idea came from, the easier it will be for you to answer the next question
Step 2: Why Do You Care?
Why do you care about your main character and the story that surrounds them?
It is important at this point that you write this down. If the only answer you have is that you think this would sell well, you probably need to go back to the idea pile. The more you care about your character, the more the reader will care.
The other question you should ask yourself is why you are the person who needs to write your story. Your feelings about the characters and your personal relationship with the theme or the point of your book will impact how the reader feels.
The reason you care, your why, will help you with the next point you need to consider.
Step 3: What is the Point of Your Story?
What do you want your readers to go away thinking about?
You should be able to summarize this in one or two sentences. If you can’t, you may need to reconsider your idea. You need to relate this back to the character and ideas that first grabbed you.
Those characters have something to say. What is it, and why does it matter that they say it? Your answer lies in these questions. Once you have this established, you can ask yourself…
Step 4: What If?
Here, you need to write a detailed and specific “what if” statement for your character and the story.
Remember that context is king – without context, like the backstory of your character (which we will get to in a moment), the conflicts that make up your story will be meaningless.
An example from Story Genius:
“What if a woman who has spent her whole life believing she’s successfully hedged her bets against love is on the verge of losing everything — the one person she’s felt close to, her lifelong career, and her grasp on reality?
“Mad with grief, she has one chance to set things right, but first, she must convince those around her that she’s not suicidal. So she devises a scheme to steal a dog for an hour or two, believing that getting a dog will reassure the people in her life that she’s back on the path to emotional stability. But when she can’t get rid of the dog, she’s forced to confront the fact that the very thing she spent her life avoiding—connection—is what makes the inevitable grief of loss endurable.”
Note the conflict that comes from not only external events but also your character’s internal struggle. The theme is dealing with grief — and the value of connection. Note that these are internal character issues that shape external events of the story.
What do we need to know next? We need to know more about your character.
Step 5: What is Your Character Like Before the Story Starts?
The next step is to write a thumbnail sketch of who your character is before the story starts. Who are they on the inside? What do they believe? Which of those beliefs, especially one that is incorrect, will this story make them face? What do they want?
In order to write the story, you need to know where your character is in life before the story starts. None of us comes into any situation as a blank slate, and your character should not either.
This information should be added to the character profile in the character tab of Plottr using the Story Genius Character template. There are sections in that template where each of the questions below about character can be answered.
Keep this information in Plottr, as you can easily reference as you move through the prewriting phase of the Story Genius method and as you write your story. Remember, this information is what you know now. It may change as you draft your story and understand your character better.
Step 6: What Does Your Protagonist Already Want?
You wrote down what your character is like and what they want in general terms, but it is time to get specific. What does your character want, specifically, in these circumstances? Even if they think they have no chance of getting it, add it to the list anyway.
In other words, this is their ideal outcome, the thing they want most at this moment.
Initially, in the example from Story Genius, the main character wants everyone to believe she is on the path to emotional stability. It is not even emotional stability that she wants, but the appearance of emotional stability. What she needs is something she denies to others and to herself that she needs: connection.
Note that this is very specific — generalities kill your story and can contribute to writer’s block. So we are going to get even more specific going forward. Remember to enter this information in the character profile you have created for your protagonist.
Step 7: Why Does Your Character Want It? (Desire)
That specific thing your character wants? Why do they want it? What do they think it will say about them? Note that this is an internal want and that one concern they have is how it will make them appear to others.
The character’s desire needs to be specific, too, because it will be something that your story’s external events impact over and over again.
This is a part of the “third rail,” as Lisa Cron describes it. The third rail gives your story its drive and is a vital part of every scene. However, the reason your character cannot get what they want is usually not an external circumstance. It’s something called a misbelief, and that is the other half of the third rail.
Step 8: What is Your Character’s Misbelief?
The thing keeping your character from getting what they want is usually a misbelief. They believe something about themselves or the world around them that is simply not true.
Usually, this is because of a core fear they have, which may be related to their personality type.
This is a good place to use the Enneagram or the Clifton Strengths test on your character. This is a great way to identify those core fears. You can then understand why your character has a false belief. As in real life, they often have more than one.
But for your story, you will focus on a single misbelief, the fear that drives it, and how it keeps the main character from getting what they want (their desire). You’ll remind yourself of these repeatedly as you plan your novel or write your discovery draft.
This is the final entry in the character profile template, at least for now. Next, we will start creating some pre-writing scenes.
Step 9: Plan the Misbelief Triggering Scene
In this step, we move from theory to practice. We will look at the moment your character’s misbelief originally took root.
In a paragraph or two, focus on two things: the misbelief your character is dealing with in this scene and the moment it took root for them. This often happens early in their lives.
You need to ask yourself a few things:
- What Did My Character Originally Go into the Scene Believing?
– What existing, healthy belief does the misbelief topple?
– Example: Initial belief: Love is safety vs. Misbelief: Love destroys - Why Does the Character Have That Initial Belief?
– What experience originally taught the character that old belief, such as the belief that love equals safety? - What is My Character’s Initial Goal in the Scene?
– What does your character initially want to achieve in this scene? Be specific. - What Does My Character Expect Will Happen in the Scene?
– This is different from the initial goal. Your character expects a certain outcome based on the goal. What is that exactly?
– The character must struggle between what they expected to happen and what is actually happening.
In the Story Genius Plot Guide template, there is a scene card dedicated to planning this scene. Answer these questions in that scene card so you have them handy for reference later. Now that we have an outline for this scene, it’s time to write it.
Step 10: Write the Misbelief-Triggering Scene
Now that you have established the moment the misbelief took hold for your main character, it is time to write the scene in which that happened.
This is not a scene for your novel. This is prewriting that you are doing for your own information. You can do this using the Story Genius Plot Guide template or your favorite writing software.
If you write this scene in another software, store it on a cloud server like OneDrive or Google Drive, and link it to your Plottr file for easy reference.
Step 11: Create Three Crossroads Scenes that Reinforce(d) the Misbelief
Throughout your character’s life, they have made several turning-point decisions that have been guided by the misbelief you established in the previous scene. Sketch them out.
To nail down three truly crucial moments for your character, consider that these moments need to have the following:
- External events that, in some fundamental way — due to intense internal conflict — cause the character’s misbelief to deepen
- A decision that had to be made, with escalating ongoing ramifications, further confirming the misbelief
- They must yield the most story-specific info
Make sure to sketch them in chronological order.
Once you have sketched them out in the scene cards in the Story Genius Plot Guide, write the scenes fully, either here in these scene cards or in the character template provided.
The goal is to have this backstory in one platform for tracking.
Step 12: What is the Obvious External Plot Problem of the Story?
Go to the Story Genius Plot Guide and free write some potential external plot problems of your story in scene cards.
What is the one big issue the character will face that will challenge their desires and misbeliefs? How is this related to their core fear?
Be sure to tie these plot problems to the internal conflicts and misbeliefs your character has, as well as their desires (what they want). Then, take your obvious external plot problem ideas and put them to this test:
- Can your problem sustain the entire novel from the first page to the last?
- Is there a real-world specific impending consequence that this escalating problem will give my character no choice but to face?
- Is there a clear-cut deadline, a ticking clock counting down to that consequence?
Choose which major plot problems meet these criteria, and then select one of them as the Obvious External Plot Problem you will use as the driver for this story.
Step 13: Make a List of Smaller Plot Problems
In the Story Genus Plot Guide, there is a place to create scene cards with various plot ideas. Separate this list on plotlines by category:
- List fully formed ideas you think could work in this story
- List some random ideas, ones that are not yet specific, but that may relate to your plot
- List some developing plot problems, ones that may be random, could work but are not quite specific enough to make it to the idea plotline
In this case, we have not gone far enough to tell whether an idea is right or wrong yet: list all of your ideas. You’ll evaluate them in the next step.
Step 14: Evaluate Plot Problems
Go to the scene card templates in the Story Genius Plot Guide and select the Story Genius Plot Problem Test Scene Template.
Use the guide to evaluate each plot idea on your plotlines. These are the requirements you are looking for in each scene:
- Is the problem capable of forcing my character to make the inner change that my novel is actually about?
- Will the problem force my character to struggle with their misbelief?
- Will the approaching consequence cost my character something big, emotionally speaking, even if they don’t achieve their goal?
When you have specific ideas that pass these tests, they can graduate from the ideas plotline to the “Romping Around Ideas” plotline.
Step 15: Develop Potentially Challenging Plot Points
Once you have some ideas that have passed all plot problem tests, it is time to get into the meat of your story.
You will now come up with ideas that will challenge your protagonist and their third rail directly. These will be some of the major turning points in your story.
You can pull these ideas from the ideas you have created in scene cards and then move them to the Scene Cards in Development Plotline. Here are some things you are looking for.
Secrets & Lies: What secrets and lies follow your protagonist into the novel? Which of these could be revealed to force them to face their misbelief?
External Obstacles: What external obstacles have you already planted in the past that will keep your protagonist from their current goal? Or possibly help your protagonist attain it? Add them to your Idea List or to Scene Cards, depending on how specific they are.
Now, look at those plot points from your Idea List. Run them through these tests to see if they can be used in your story. Explore them in chronological order as best you can.
Get rid of anything that has dubious logic and doesn’t pass the previous tests or the following questions:
- Does your plot need it to happen? Why must it happen for your plot to work?
- Logistically, why can it happen? Is it actually possible?
- Why would it happen, given your protagonist’s inner struggle?
When this process leads you to fresh ideas and info, add these to your Ideas List. If any specific scene solidifies for you, then create a Scene card for it.
Step 16: Digging for Subplots
Look over your Idea List and your scene cards and identify any potential subplots that pop out at you.
Make a list of potentials in order of appearance of your novel… or what you guess would be the order of appearance.
Once you have established what these might be, look at the list and identify any subplots already in play when your novel starts.
Ask yourself, how will this subplot matter to my protagonist? Will it matter? If the answer is no, then this subplot does not belong. If yes, add the idea to your subplot plotline.
Ready to Write Your Story?
Get started with a free 30-day trial of Plottr. Before you begin writing, be sure you have completed these steps and fully understand your character and their backstory. The way you start will vary from writer to writer, partially based on whether you are a discovery writer or a plotter.
- If you are a discovery writer, start to write your story with some of the ideas you have created in mind, and take into account what you know about your character, their misbeliefs, and their desires
- If you are a plotter, finish developing your plot with the ideas you have added to the Story Genius Plot Guide
- Use the Story Genius Scene template to ensure your scenes are necessary and answer all the necessary questions
- As you further develop your characters, fill out or continue to add information to the Story Genius Character template so that the details you have created about your character are consistent and clear
- Continue to use the Story Genius tools to revise your work
If you use this method because it resonates with you and makes sense to your writing process, your drafts will be cleaner and better in the long run.
Time to Become a Story Genius
Whew, that is a lot to process. That is why we have broken this down into smaller bites that deal with specific parts of this template, like the Story Genius Plot Guide, the Story Genius Character Template, and the Story Genius Scene Template.
You can find this documentation through the links found in this article as you work your way through the process, or by following those below.
Find videos detailing this and other templates on our YouTube Channel. Let us know your thoughts on this and other plot templates in the comments below.
How have you used Story Genius, and how has it helped your process? We look forward to hearing from you and seeing the stories you create.

Troy Lambert
Troy is an author, editor, and book coach. The author of over 30 novels and several works of nonfiction, he’s also a true story structure nerd. When not behind the keyboard, he can be found exploring the mountains of Idaho, where he works, lives, and plays.

CJ Anaya
CJ is the USA Today bestselling and award-winning author of The Healer. She writes teen and young adult fantasy romance, and when she isn’t writing, she’s coaching other authors on publishing and marketing their books.


4 thoughts on “Story Genius Method: 16 Steps for Smarter Outlining”
Guys, I’m super excited to use this!
Unfortunately, none of the templates mentioned in this article are available in my Templates list. I made sure I have the most recent update, and that didn’t work. Just for fun, I re-downloaded and re-installed Plottr. That also didn’t work.
So how do I access this template?
Hey Josh, great to hear that you’re excited to use this Plottr template. If any templates aren’t showing or you have any other tech issues, please email support on support @ plottr dot com. They’ll see you right 🙂
Thanks, Jordan!
It’s a pleasure!