What’s a series bible (or show bible), and why do authors and screenwriters swear by them? These tools for managing large writing projects have nothing to do with scripture — but they’re so useful, they might just convert you into a lifelong planner!
What is a Series Bible?
A series bible (or show bible in TV lingo) is a handy reference guide to help you keep long-form narratives consistent.
While some details can change (remember the infamous haircut in Felicity?), permanent elements like backstory shouldn’t — unless time travel is involved!
But a series bible does more than track backstory. Use it to:
- Avoid continuity errors in places, plotlines, and timelines across books (or episodes/seasons).
- Track multiple arcs — from subplots to overarching series-wide developments.
- Organize key events and details, whether tied to characters or your story world as a whole.
Now that you know the benefits, here’s how Plottr makes building a series bible simple and fun.
Create a Series-Wide Overview
Want a bird’s-eye view of your series? Plottr’s Project tab is your starting point. Here you can:
- Add and organize your books (or episodes/seasons)
- Track titles, premises, genres, and themes
- Apply cover art ideas to visualize your tantalizing end-goal clearer
- Outline overarching series premises and themes
Plottr’s Series View lets you map plotlines across your entire series, with a timeline spanning across your whole project. Rename your plotlines (e.g., to book titles) and customize scene card columns to track what matters most — like “Inciting Incident” or “Climax”. That way, you can see key plot points from each book in your series laid out in parallel.
💡 Hack: Customize scene card column titles to create a seamless overview of your series, focusing on the details you want.
Save Time Setting Up Your Series Bible with Custom Templates
This tip’s a time-saver (and something Plottr fans ask how to do often). Save a book outline you’ve set up just the way you want it to re-use whenever you start outlining a new book in your series.
This is useful because:
- You won’t start from scratch each time you add a new book/episode/other unit
- You can customize your plotline and heading titles however you want. Label each scene card column as a chapter, scene, beat, take, or whatever you like
How to Create Templates to Re-use for Books in a Series
Here’s how to ensure you never have to start from a blank timeline:
- Step 1: Go to the Timeline tab after creating a new book in the Project tab (you could also complete this process in a separate Plottr file).
Set up the plotlines you want (for example, you may want a plotline for “Main Plot,” another for “Antagonist’s Arc” — whatever works)
- Step 2: Once you’ve set up your template just the way you want, click the three dots top-right and choose Save as Template
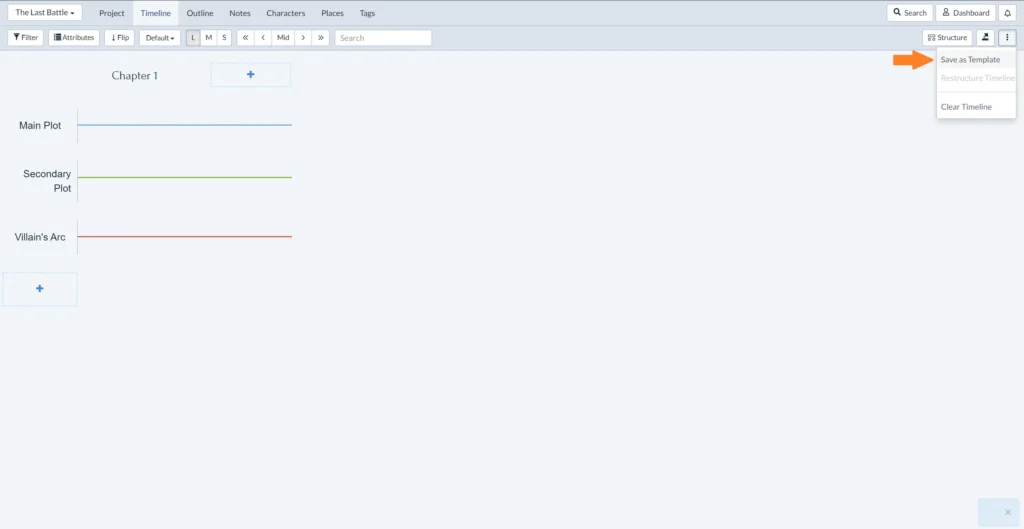
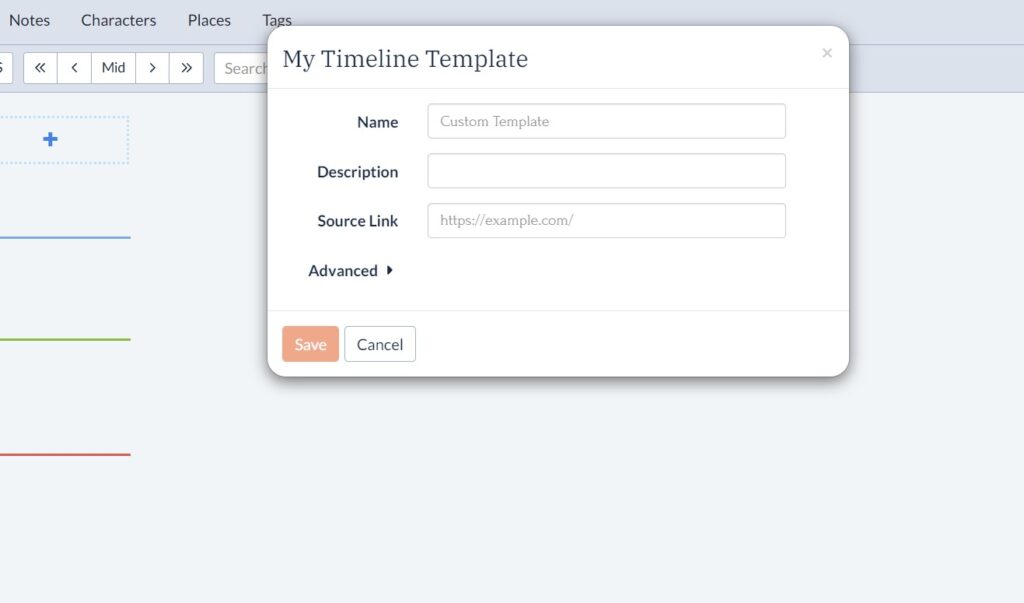
- Step 3: Name your template, e.g., “Narnia Series Book Template,” add any notes, and click Save.
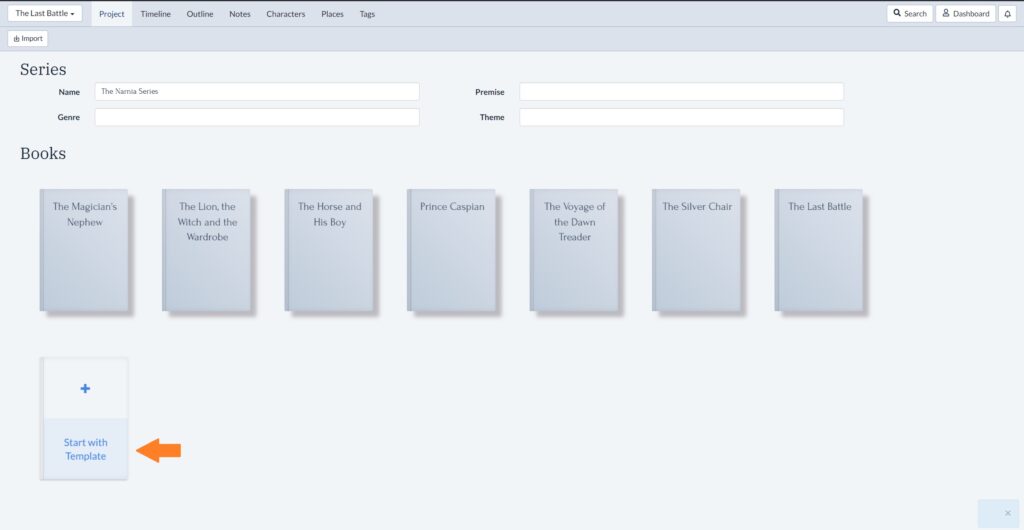
Step 4: When adding a new book in the Project tab, click Start with Template, select your saved template from the previous step, then click Choose.
Now you can leap into planning your next title faster than a hero stumbling through a magical portal they didn’t even realize was there.
💡Tip: Use templates to jump into planning faster than your hero can stumble through a magical portal!
Organize and Filter Notes by Book
In Plottr, the Notes tab is your series bible’s sidekick. Assign tags to notes for specific books, characters, or places, then filter them to quickly find what you need.
Each book you create in the Project tab is available as a tag to apply to any note you create in the Notes section.
This means that you can assign notes to specific books in your series, then see at a glance the notes that apply to a specific book using filters.
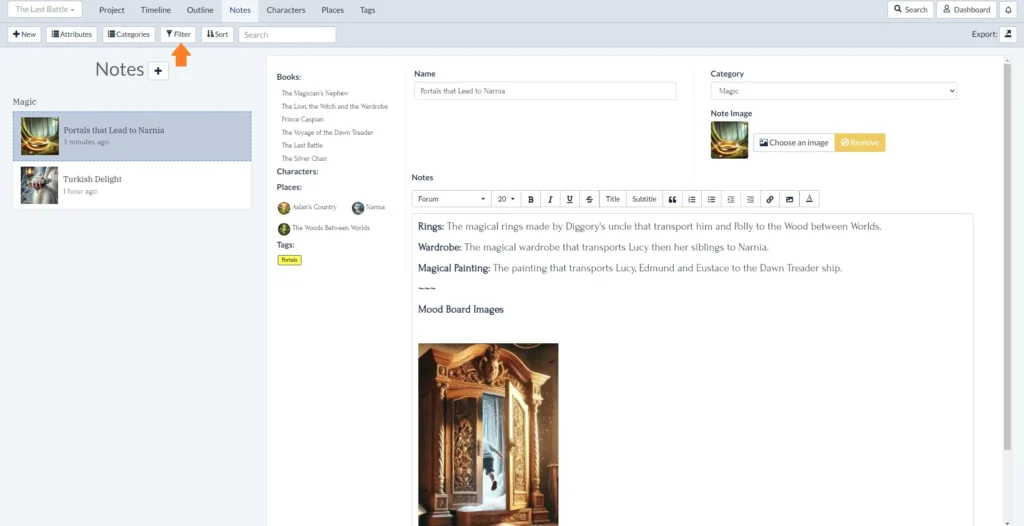
In this example, we’ve made a note called “Portals That Lead to Narnia” and categorized it under “Magic.” Then, we’ve added tags to the note for each book in the Narnia series that features magical portals of some kind.
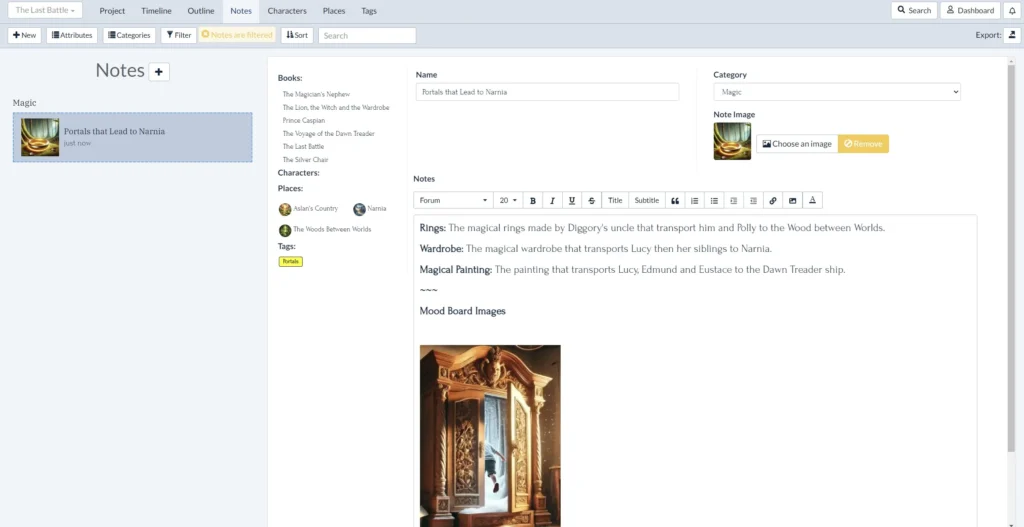
Filtering Notes in Your Series Bible by Book in Plottr
We’ve created a second note under a category labeled “Magic” called “Turkish Delight” — what the White Witch uses to tempt Edmund Pevensie to serve her goals in The Lion, the Witch and the Wardrobe.
This magical treat is tagged with The Lion, since it appears in that book. Now if we filter our notes by book, if we choose any book other than this, the Turkish Delight note is hidden.
You can filter your series bible notes by more than just which books each applies to. You can also filter notes by other details, including:
- Characters. For example, you could tag the “Turkish Delight” note with the White Witch and Edmund. This note would then display when you filter by each of these characters
- Places. Tag your series bible notes with the places associated with them (for example, you could tag characters who never set foot in Narnia with “Earth” or “The Ordinary World”)
- Categories. This is useful for focus — zero in on one category at a time as you brainstorm or reverse outline what you’ve already written
- Tags. You can also add tags you’ve created in the Tags view to any note. This makes it possible to filter notes by any detail you want (for example, “Theme: Temptation” or “Features in Every Book”)
💡Hack: Color-code your tags so that you can see at a glance even more easily what each note is about!
How to Search and Filter Your Series Bible Notes in Plottr
To filter notes in your series bible:
- Step 1: Click Filter funnel icon in the top ribbon while in the Notes tab
- Step 2: In the dropdown menu, click the empty checkbox(es) next to what information you want displayed in the current screen. An eye icon will appear in selected boxes (to show this information is visible), and a tag next to the Filter button will appear: “Notes are filtered”
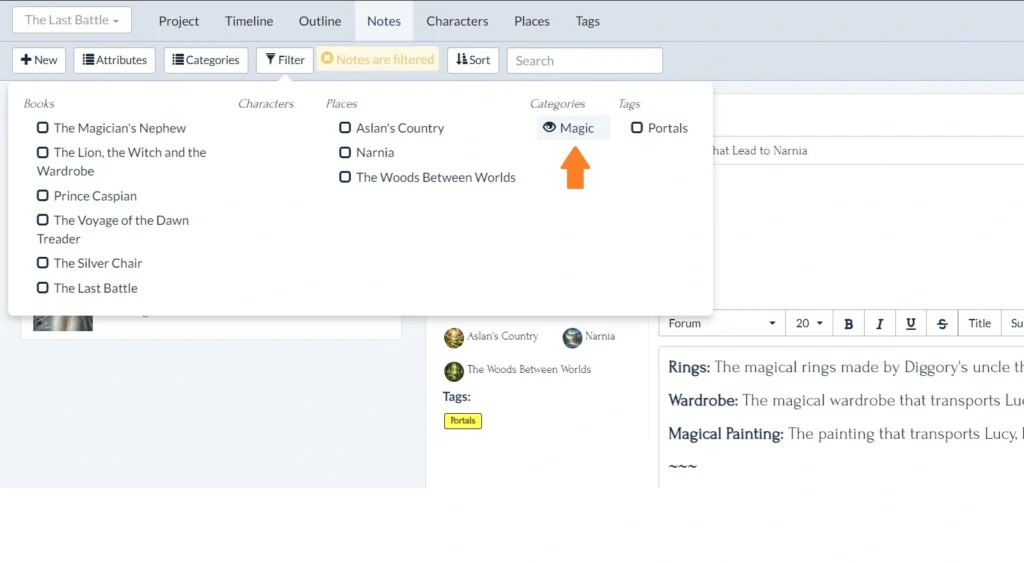
Step 3: To reset to displaying all of your notes with no filtering, click that “Notes are filtered” tag.
To Search through your notes:
In the Search bar in the Notes tab, start typing (for example, just the two letters “tu-” filters the notes we have so far to display only the note on Turkish Delight as a magical temptation in the world of Narnia.
💡Tip: To return to seeing all notes in the Notes view after searching, remove any text in the search bar.
Consolidate Separate Book Outlines in a Single Series Bible
What if you’ve planned a standalone book (or a book you thought was a standalone) and a sequel idea starts clamoring to be written?
You can use Import Plottr to Plottr to bring Plottr files together into one book project. Here’s how:
- Step 1: Go to the Project tab and click Import top left
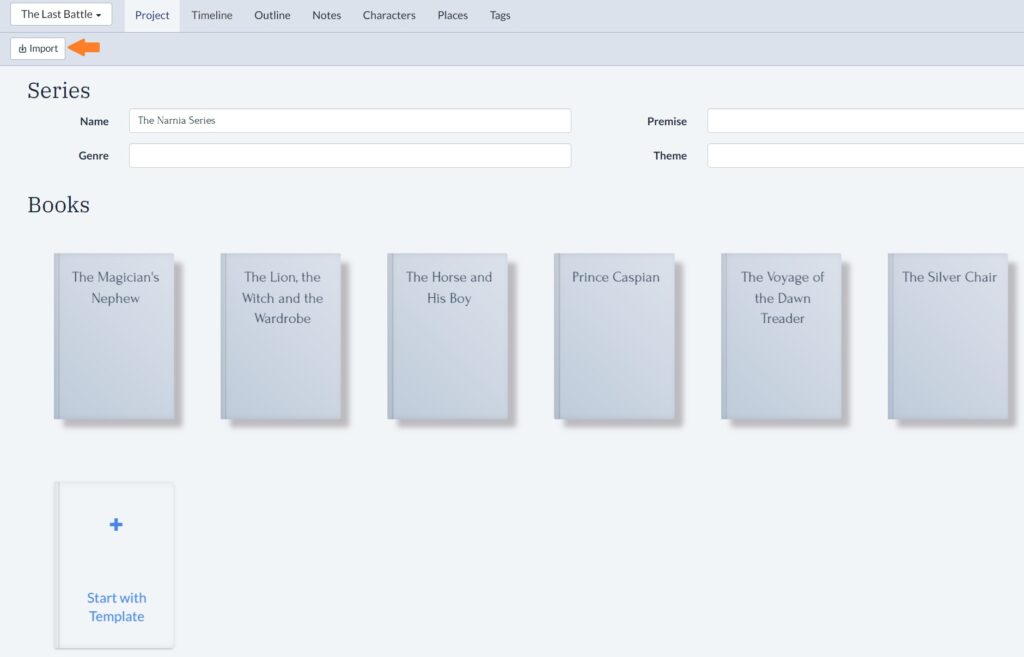
- Step 2: Choose from your list of projects or a local file and click Open
- Step 3: Select what you want to import to your project from the file you’ve chosen: books, notes, characters, places, tags and custom attributes
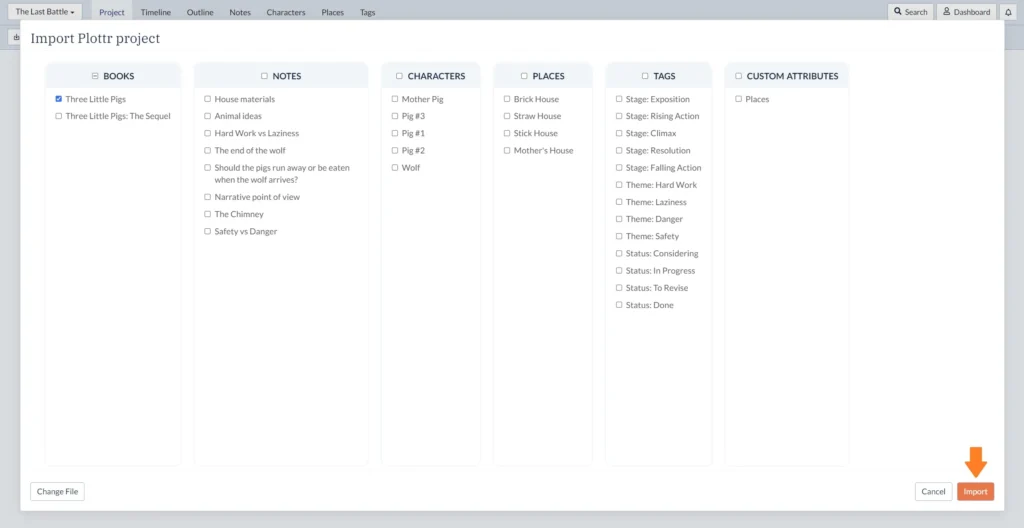
In this example, for demo purposes, we’re importing the “Three Little Pigs” demo file, and just the book (not the series). This gets added to our project tab as a new book in the series:
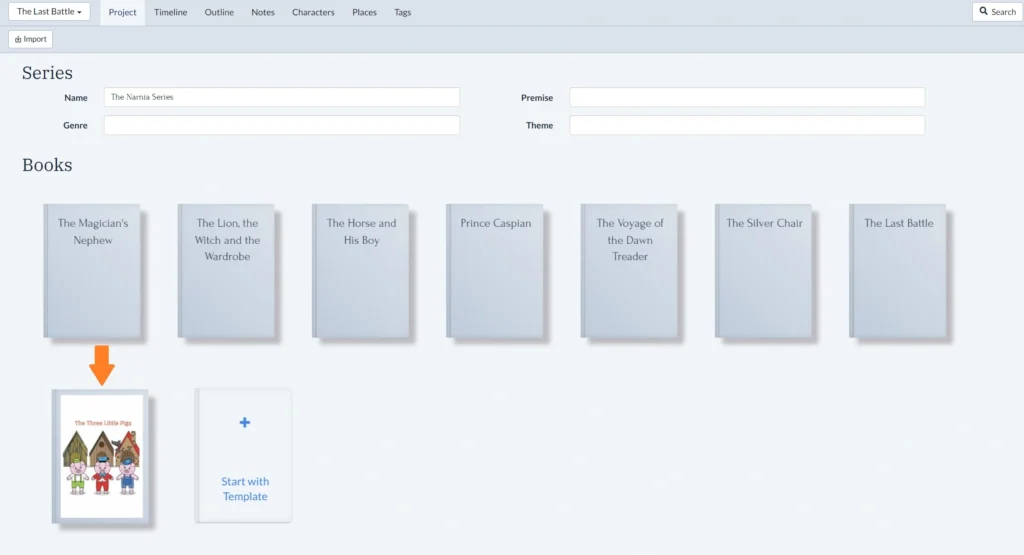
💡Hack: Hover over any of the books in your project tab and click the image icon to upload a cover design.
Keep Place Details Categorized and Organized
Places may change over a book or series (like when the Hobbits return to find a path of destruction at the end of Tolkien’s Lord of the Rings cycle).
At the same time, Cairo shouldn’t morph into Clapham or Alabama into Alaska. The details that are constant need to be consistent. This is where the Places tab in Plottr is extremely useful.
There are several hacks here for making a handy story bible:
- Create Your Own Custom Categories. For example, in the screenshot below, we’ve created a category called “Portal-linked” for places that are accessible via portals in the Narnia universe.
- Assign images to places. These are helpful for seeing where a scene or note is linked to in your story at a glance. When you tag a scene card or note with a place assigned an image, it shows as a thumbnail there.
- Filter and search the list of locations in your series. The same filter and search tools available in the Notes tab are available for your settings list.
The more world details you add, the more the contrasts in your series come into view.
For example, here we’ve used AI to quickly generate a few visuals for a 1950s street in England, the wintry world of Narnia (during the White Witch’s reign), the Wood between Worlds (from The Magician’s Nephew), and the paradisical world of Aslan’s country.
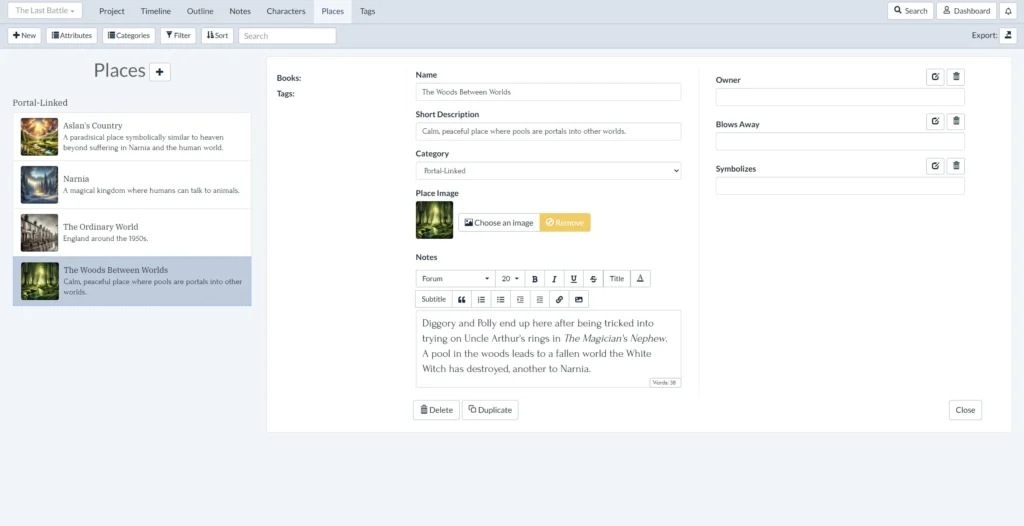
These are just some of the tools you can use to create and grow your series bible in Plottr.
The Outline tab gives you more ways to visualize your series plan, too. Read more about Outline V2, an update released in Plottr v2024.10.9.
Start Creating Series Bibles and Organize Every Arc
We’ve just scraped the surface of ways Plottr will help you outline series and store all the information you need to recall. Start having fun outlining with a free 30-day trial.
Already a Plottr fan? What’s your best hack for building series bibles using these tools?



Comments