Action-Adventure Beat Sheet: Indiana Jones and the Last Crusade

Want to write an action-packed screenplay or novel? This action-adventure beat sheet for Indiana Jones and the Last Crusade (1989) has it all: narrow escapes, relentless villains, and life-or-death leaps of faith. Find out what makes this a Steven Spielberg classic.

About this Movie Beat Sheet Series

We’re analyzing and reverse-outlining Team Plottr’s favorite movies to bring you plot structure insights! Our Head of Operations, Troy Benton, chose Indiana Jones and the Last Crusade.

Click here to download a detailed beat sheet of this action-adventure romp, made in Plottr. If you don’t have Plottr yet, start planning for free with a 30-day trial!

Indiana Jones and the Last Crusade beat sheet

Why Study Plot in Indiana Jones and the Last Crusade?

This story follows the action-adventure plot template surprisingly closely (available in Plottr). It shows that to tell an entertaining action-adventure meets historical epic, you don’t need to reinvent the biplane.

Here’s why Troy chose this movie. Keep reading for a plot breakdown, from ‘Hero’s Circumstance’ to ‘Conclusion.’

Plottr Head of Operations Troy Benton
Troy Benton, Team Plottr

What Makes This Story Great?

Troy: The film seamlessly weaves together thrilling action sequences, globe-trotting adventure, and genuinely witty banter, particularly between Indy and his father.

What do you Love about the Plot and Story?

Troy: The dynamic between Harrison Ford’s Indiana Jones and Sean Connery’s Henry Jones Sr. is a highlight. Their father-son relationship, filled with both tension and love, provides a strong emotional core to the story. Their bickering and eventual bonding are incredibly engaging.

This is arguably the biggest strength of the plot. Instead of just another quest for a powerful artifact, the central motivation for Indy is to find and save his father, Henry Jones Sr. This personal stake elevates the entire narrative.

Their initially strained relationship, filled with witty banter and historical grievances, evolves beautifully throughout the film. You see their respect and understanding for each other grow, culminating in a truly heartwarming and earned bond.

What can Authors and Screenwriters Learn from Indiana Jones and the Last Crusade?

Troy: The plot is well-structured and moves at a brisk pace, keeping the audience engaged from start to finish. The quest for the Holy Grail is a classic adventure trope, executed perfectly.

While the Holy Grail is the tangible goal, the true MacGuffin of the film is the reconciliation and bond between Indy and his father.

This emotional journey gives the adventure depth and resonance beyond just a treasure hunt. Authors and screenwriters should consider what emotional stakes underpin their plot, even in genre stories.

What are Some of Your Favorite Scenes and Moments from the Movie?

Troy: Where do you even start?

“Don’t Call Me Junior!”

The scene where Indy and Henry are tied up in Castle Brunwald and Indy angrily snaps at his father, then proceeds to machine-gun the Nazis while still tied to the chair.

It’s hilarious, action-packed, and perfectly encapsulates their bickering yet ultimately effective partnership. The look on Henry’s face after Indy’s outburst is priceless.

“No Ticket!”

The whole sequence of them trying to escape the Zeppelin is fantastic, but the moment Indy throws the Nazi out of the window and then casually asks the terrified passengers for their tickets is pure comedic genius.

It shows Indy’s quick thinking and dark humor, contrasting beautifully with Henry’s more scholarly, less pragmatic approach.

“Indiana… let it go.”

This is the emotional heart of the film. As Indy dangles precariously, reaching for the fallen Grail, his father, injured and near death, finally calls him “Indiana” instead of “Junior” and tells him to “let it go.”

It’s the moment their relationship truly mends, and Indy chooses his father over the ultimate artifact. It’s a powerful statement about what truly matters.

The Ride into the Sunset

The final shot of Indy, Henry, Sallah, and Marcus riding off into the sunset, with the iconic theme music swelling, is a perfect, optimistic, and deeply satisfying ending to the trilogy. It leaves you with a feeling of adventure, friendship, and resolution.

What did this movie teach you about what makes a good story?

Troy:The film continuously escalates the stakes and obstacles. From the initial mystery of Henry’s disappearance to the perilous trials in the Grail temple, each scene raises the tension.

Screenwriters should learn how to gradually increase the pressure on their characters.

Also, the personal stakes for Indy, trying to save his father, elevate the adventure beyond just finding an artifact.

Make it personal. Make it real.

*

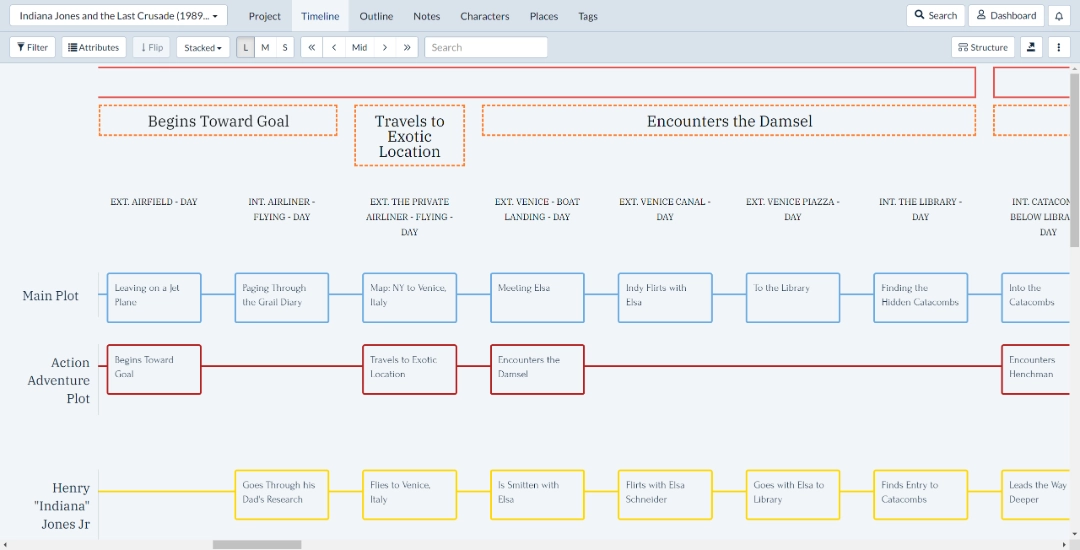
Thanks, Troy! Let’s unpack how Indiana Jones and the Last Crusade matches a proven action-adventure plot structure:

Beat Sheet and Summary

Hero’s Circumstance

Beginning of Act 1

The opening beat of an action-adventure introduces the main character’s ordinary world. Are they seeking adventure or avoiding it? Content with their life or dissatisfied? 

The movie begins with a scout troop riding out to the desert in the American South. A young Henry “Indiana” Jones Jr (played by River Phoenix) and his friend Herman see relic thieves unearth a cross that Indy says ‘should be in a museum.’

Indy snatches the cross while he sends Herman to go tell the sheriff.

The relic thieves spot Indy as he’s making his getaway, leading to the first of many high-speed chases (including Indiana leaping from horseback to a circus train and driving back an African lion in a boxcar). There’s also a mysterious man in a panama hat…

Back home, Indy tries to get his distracted dad Henry Jones Sr’s attention (Sean Connery). Henry Sr (a medieval literature professor) makes Indy count in Greek and wait while he pores over Roman numerals.

The sheriff arrives with the relic thieves in tow, but makes Indy give the ‘stolen property’ back. The leader is impressed, though, and gives Indy his fedora.

Cut to years later, and the man in the Panama hat punches Indy, captured at sea off the Portuguese coast. He takes the cross back, but Indy succeeds in freeing himself and blows the boat up, reclaiming the cross and escaping to safety.

Although it’s clear Indiana Jones’s ‘ordinary world’ means adventure, we also see the more prosaic side of his life. He lectures archaeology at Barnett College and shares his acquisition of the cross with his pal, Marcus Brody (Denholm Elliott).

Later in his office, he finds a mysterious envelope postmarked from Venice.

Receives a Mission

Middle of Act 1

This section triggers the rest of the story. The hero encounters a problem or is given a mission. There are many options: The hero may stumble into the villain’s scheme. The event should be one that will not resolve independently.

Indiana Jones is walking in the streets outside Barnett College when he’s approached by three FBI-like men. They take him to see Walter Donovan (Julian Glover). 

Donovan reveals a sandstone tablet that speaks of the Holy Grail of Arthurian legend. He’s been researching its fabled whereabouts. One marker points to Venice, Italy. 

There’s a small snag: His lead researcher has gone missing. That researcher just so happens to be Indy’s father. 

Indy rushes to his father’s home, accompanied by Brody. It’s been ransacked, to his further worry. He remembers the envelope and opens it. 

Inside, Indy finds a small notebook. It’s his dad’s Grail diary, full of years of research notes about the fabled chalice. He tells Brody to call Donovan to say he’ll go to Venice. Brody says he’ll accompany Indy.

Action-adventure writing tips - infographic

Begins Toward Goal

Middle of Act 1

The hero has answered the call to action and begins toward the goal. New allies are introduced or already strategically placed, while other allies may be recruited as the plot progresses. The hero and allies begin to form a plan of action and prepare for the journey ahead.

Indiana Jones and Brody prepare to leave an an NY airfield. They’re flying Donovan’s jet, and he tells them a Dr Schneider will meet them and to trust no-one.

Onboard the jet, Indy reads his dad’s Grail diary to prepare. He stops on a sketch that resembles a stained glass window, with Roman numerals beneath it. They touch down in Venice.

Travels to Exotic Location

Middle of Act 1

The hero sets off to an interesting or exotic location, crossing the story’s first threshold and beginning the mission in earnest.

The hero must locate an important object, person, location, or information; in their search, they may attempt to infiltrate the villain’s organization.

The tension and danger increase in this section as the hero seeks to meet with allies – who may turn their back – and others to gain resources needed for the mission.

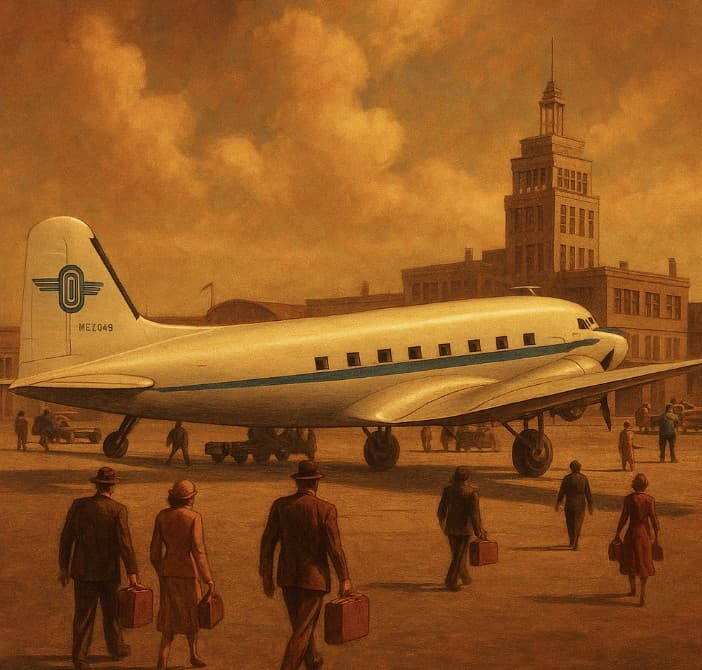
A map overlay appears as Indy flies to Venice, reminding us that he’s leaving his ordinary world for criss-crossing canals (and soon, catacombs). 

Leaving for Venice - Indiana Jones and The Last Crusade

Encounters the Damsel

End of Act 1

While gathering information and putting the plan into action, the hero encounters another obstacle in the form of the damsel and a relationship forms.

Depending on the nature of the relationship, it may help or hinder the hero along their journey. The damsel may appear in distress, or as an ally or adversary, though the true nature of the damsel may change or take time to unfold.

At the boat landing in Venice, Italy, Indy and Brody are surprised when the doctor they are scheduled to meet appears. Elsa Schneider is a striking, confidant woman and Brody tips his hat to her.

Indy flirts with Elsa and steals a flower for her, but Brody reminds him of their true purpose. She hands Indy a scrap of paper that she found near Indy’s dad’s chair. It’s marked with Roman numerals: a first real clue.

Elsa leads Indy and Brody to a Venetian library where they find a secret entry to catacombs beneath the city, guided by Henry Jones Sr’s notes. Indy hands the Grail diary to Brody who hangs back, asking him to look after it.

Encounters Henchman

Beginning of Act 2

The tension continues to rise as the hero is faced with an obstacle. This section is a turning point in the story and serves to alert the villain to the hero.

Allies or adversaries may switch sides, the hero may end up on the wrong side of the law, or the authorities may be corrupt. The obstacle threatens the mission, but once overcome, it provides vital information.

Indy and Elsa descend into the dank, eerie catacombs. They discuss that a knight of the First Crusade may be buried there, as Elsa lights the way with an ivory cigarette lighter bearing a four-leaf clover emblem.

While Indy and Elsa explore the catacombs, Brody is ambushed by a man named Kazim (Kevork Malikyan) and armed men and knocked out.

Indy and Elsa, meanwhile, continue and Indy sees the Ark of the Covenant symbol (a throwback to the first movie, Raiders of the Lost Ark). Indy finds a Roman numeral X and rams his shoulder into a wall to make a new path.

The way gets harder (knee-deep-water-swarming-with-rats harder). They power through, while Kazim follows close behind.

They come to an ancient burial room and find the knight’s remains. The emblem on his shield matches the grail tablet and Indy overlays a rubbing his dad made to find a missing clue.

Just then, Kazim strikes a match, dropping it to the oil-slicked water.

Chase

Early in Act 2

Increase the tension and the stakes with an extended chase scene.

Having obtained vital knowledge and slipping their dire situation, the hero is now pursued by evil forces. The chase generally involves the hero, allies, damsel, and several enemies.

This scene provides an opportunity to further showcase the Hero’s abilities and hook the reader with stunning physical feats, fantastic vehicles, daring maneuvers, etc.

Indy and Elsa flee a torrent of panicking rats and a giant fireball Kazim caused. They shelter under a coffin lid in the water, using the air pocket until Indy swims under and finds them a way out.

They emerge in St Mark’s Square (the Piazza San Marco), but Kazim and his men give chase.

Indy and Elsa leap into a motorboat, pursued by the men. They chart a way into the harbor. One of Kazim’s men leaps onto their motorboat, but Indy manages to knock him off.

In the harbor, Elsa navigates them through a narrow opening between two freighters. The gap grows too small for a pursuing motorboat that goes up in flames. Kazim, meanwhile, has gone around another route.

Kazim reappears, firing on them with a machine gun.

The bullets set Indy’s boat ablaze and he leaps into Kazim’s, the two men fighting as they hurtle towards a giant propeller.

Indy demands answers, and Kazim reveals he belongs to the Brotherhood of the Cruciform Sword, a secret society sworn to protect the Grail. He reveals Indy’s dad is being kept in a castle, the Castle Brunwald, on the Austro-German border.

Major Complications

Early in Act 2

A major complication arises to cast doubt on the hero’s chances of success. The Hero makes a significant error or suffers an unexpected setback, demonstrating that they may not be ready or capable of completing the mission.

The first complication: Indy’s dad’s being held somewhere inaccessible and fortressed. Back in Donovan’s Venetian apartment, Brody, nursing a bump from the library assault, studies the revelations from the knight’s shield.

Brody and Indy deduce that the starting point of the Grail quest lies in İskenderun, Turkey. It’s a seaside port, formerly known as Alexandretta.

Indy returns to his room to find it ransacked, and Elsa’s has been too. She reacts shocked and is upset when she learns Indy has had the Grail diary belonging to his dad all along.

There is mistrust between them that quickly turns passionate as they fall into bed together.

Indy’s increasing entanglement with Elsa adds another, secondary layer of complication, the way romantic subplots often do.

Assistance

Middle of Act 2

The hero receives assistance and inspiration that emboldens them to return to the fight. The assistance may come in the form of a pep-talk by a mentor or love interest, the return of an ally, completing a dangerous task, or realizing the importance of a previously undervalued item.

Indiana Jones and Elsa arrive at the Castle Brunwald in Austria. Indy asks her for intel that will help them gain access, and she mentions the Brunwalds are known art collectors.

They swap clothing, Indy wearing Elsa’s beret, and he poses as a baron come to see the castle’s tapestries, knocking the suspicious butler who answers the door out cold.

Infiltrate the Fortress

Middle of Act 2

Newly inspired, the hero travels to and infiltrates the villain’s secured fortress, usually in a remote and difficult to access location.

The hero uses their renewed confidence and knowledge to battle their way past security, henchmen, and impressive guard animals. They are determined to defeat the villain.

Indy spots a wired door behind which he guesses his father is being held, and uses his whip to swing from exposed wires on the outside of the castle to break through closed shutters.

Henry Jones Sr, assuming an intruder, whacks Indy over the head with a vase. He seems more upset about damaging a priceless Ming vase than potentially harming his son and rescuer (until they deduce it’s a fake).

Dad and son catch up, sharing excitement over the Grail clues discovered. But then, Nazi soldiers burst in and demand the Grail diary.

Henry Sr is mad that Indy has the Grail diary on him, risking it falling into enemy hands. They bicker until Indy grabs a machine gun from the Nazi soldiers and mows them down, enraged.

The two men proceed into the castle as Indy looks for Elsa.

Captured

Late in Act 2

Perhaps overconfident or overwhelmed by the odds, the hero finds themselves captured by the villain.

The hero is in a dire situation as the villain begins to torture the hero and possibly attempts to kill someone close to them. The tension and stakes are high as the hero’s success and future are cast into doubt.

Indy and Henry find Elsa held at gunpoint by the brutal Nazi Colonel Ernst Vogel (Michael Byrne). Henry warns Indy that Elsa is also a Nazi, but Indy is torn as Vogel threatens her life, dropping his weapon.

It turns out Henry was right: Elsa relieves Indy of the Grail diary, handing it to Vogel. Betrayed.

Indy and Henry are bound and led into a room lit by firelight, only to meet a familiar figure (and another betrayal): Walter Donovan, in cahoots with the Nazis.

Donovan flips through the diary and notes pages are missing. Elsa deduces that Indy gave the missing pages to Brody, and Indy plays this up for the upper hand.

Meanwhile, in Iskenderun, Turkey, there’s another capture: Brody meets Indy’s contact, Sallah, but ignores Sallah’s warning to run. The Nazis kidnap him in a troop truck.

Back in the castle, Indy and his dad are tied in chairs back to back, while Donovan and Elsa finalize their plans.

Elsa must take the Grail diary to Berlin. Before she leaves, she tries to justify her betrayal to Indy, saying he’d have done the same.

Once she’s gone, Indy manages to wriggle Elsa’s lighter over to his dad to burn the ropes tying them, but his dad fumbles the lighter, setting the room on fire.

Vogel and Donovan have stayed behind with their soldiers, and Vogel receives chilling instructions from the Fuhrer himself to kill the Joneses.

Narrow Escape

Late in Act 2

Through guile, planning, or luck, the hero manages to escape the villain’s grasp and rescue their allies, mentor, damsel, or love interest; if the hero cannot free themselves, they may be rescued by them.

Either way, the hero escapes the clutches of certain doom.

Indiana Jones and his dad hop their chairs over to an empty fireplace, the only safe spot left. While trying to free himself, Indy accidentally triggers a hidden mechanism, revolving the heart around into a Nazi control room.

They revolve back to the burning room, then back to the control room. The Nazi radiomen planning their operations spot them and give chase.

Indy manages to lure one soldier into the room on the other side alone and kills him. He manages to trap the other soldiers in the burning room, wedging a bust of Hitler in the mechanism.

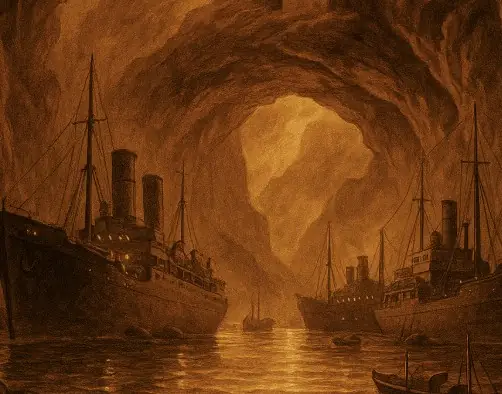
Indy and Henry flee through the castle, and seek a passageway out. Henry accidentally opens a trapdoor when he sits in a chair, and it leads down to an underground harbor where they bicker some more.

Vogel has returned meanwhile, and closes in as they make their getaway. They find a motorboat and slip away. Vogel sees the missing boat shortly after, and orders his soldiers to round up the two men.

Indy and his dad reach the shore and steal a motorbike, his dad riding sidecar. They manage to fend off pursuers with a broken flag pole. They reach a crossroads and bicker.

Indy thinks turning back to Venice and Brody are the priority, but Henry argues they should go to Berlin to retrieve the Grail diary from enemy hands, given their dark intents for the power it offers. Indy gives in and they make way for Berlin.

Harbor beneath Castle Brunwald

Attain the Goal

End of Act 2

Now free (and angry), the hero seeks out and obtains the item, person, or information they were seeking. Once the item is obtained, the hero proceeds to wreak havoc.

Indiana Jones finds and confronts Dr Elsa Schneider at a Nazi book-burning rally. He wrests the Grail diary from her, and they have a heated exchange where she says she believes in the Grail, not the Swatiska. Their standoff is tense and unresolved.

Indy and Henry bump into the Fuhrer himself. In a moment of absurd comedy, he signs the Grail diary, thinking they want his autograph.

Grail diary reclaimed, Indy and Henry Sr prepare to fly out of Germany on a zeppelin. As they blend in with the crowd, they see Vogel marching across the airfield.

Battle the Henchman

Beginning of Act 3

The hero’s escape is not yet complete as they confront or are confronted by the loyal henchman of the villain. An exciting battle occurs with the hero ultimately defeating the henchman.

As Vogel boards and passes around a photo of Henry for identification, Indy reappears, disguised as a ticket collector, and punches Vogel in the face before throwing him from a window. When people ask what happened, he deadpans, “No ticket!’

Vogel shakes his fist down on the tarmac, swearing revenge.

As the zeppelin takes off, Indy and his dad get talking and the conversation grows tense as Indiana recalls how lonely it was growing up with his dad.

They shift focus to the Grail’s final trials, and cryptic clues about them. They’re just settling in when they realized that the zeppelin is being turned back toward Germany.

Dad and son head for the emergency exit, commandeering a biplane with Henry Senior riding gunner.

German fighter pilots come after them and Henry is confused at first, thinking o’clock is a reference to time. He shoots but swings and takes out their own tail stabilizer, forcing a crash landing.

The fighter pilots are relentless as Indy and his dad hide behind a dry wall. They steal a car from an old man, and another chase sequence begins, as they outfox one pilot after another.

Dad and son wind up on a German beach, pursued by the final fighter pilot. Henry Sr uses his umbrella to scare a flock of seagulls, driving them into the pilot’s propeller so that it chokes up the engine and his plane falls from the sky.

Indy’s dad returns, proud of himself and quoting Charlemagne: “Let my armies be the rocks and the trees and the birds in the sky.”

Battle the Villain

Middle of Act 3

The hero faces off with the villain in a fantastic battle. The villain may attempt an escape, be captured or killed.

Alternatively, the Hero’s attempt to defeat the villain may go terribly wrong.

Back in Turkey, Walter Donovan bribes the Sultan (Alexei Sayle) for military aid.

Indy, Henry and Sallah arrive in İskenderun and Indy presses Sallah for news about his captive friend, Brody. Sallah reveals the Nazis have gone ahead with him.

Donovan’s convoy rides through a canyon as he gloats over Brody and Brody snaps back. Meanwhile, Indy, Sallah and Henry watch from a ridge. The glint of sunlight on Indy’s binoculars gives away their position.

An enemy tank blows up their car. Sallah’s upset (it belonged to his brother-in-law). As they’re watching, the Turkish men accompanying Donovan turn on his crew: It’s Kazim’s Brotherhood of the Cruciform Sword, protecting the Grail.

Indy and allies seize the opportunity. He steals a horse, and they close the distance. Kazim is mortally wounded but warns that the Holy Grail holds eternal damnation for the unrighteous.

Henry and Brody reunite but are captured and placed under watch in the tank. The Nazi Colonel Ernst Vogel interrogates Henry about the Grail diary. The conversation is interrupted when Donovan tells Vogel Indy is making his getaway.

The tank chases Indy on horseback, firing, until he wedges stones in the main turrets.

Indy and Vogel wind up fighting hand to hand atop the tank, Vogel choking Indy with a metal chain, as the tank hurtles toward a cliff, Henry Sr and Brody still trapped inside.

Indy manages to free Brody and his father, with Sallah’s help, just as the tank goes over the cliff’s edge, Vogel screaming and Indy’s fate uncertain.

Plot Twist

Middle of Act 3

The hero has battled the villain and destroyed their fortress, but the story is not yet over. The plot twist must capture the reader’s attention and let them know that the mission is not yet complete.

Everyone thinks Indy is dead, yet he survives and the wind carries Indy’s fedora to his feet.

Meanwhile, Donovan and Elsa approach the Grail’s temple. Indy and allies arrive soon after.

Donovan sends two of the Turkish men ahead, and a hidden trap beheads them.

Donovan shoots Indy’s dad, knowing that Indy will do anything to save him.

Indy fulfils the Grail’s challenges, using his dad’s Grail diary to guide him. He comes to a massive chasm that seems to demand a literal giant leap of faith.

Indy prepares himself and leaps. It turns out the chasm contains a trick forced-perspective painting and there is a bridge across. He throws dirt on the bridge to cross safely, Elsa and Donovan following behind.

Indy finds a knight near an altar lined with hundreds of chalices. The knight attempts to fight him, but proclaims him his successor.

There is a final challenge: Choosing the true Grail. Donovan accepts a chalice Elsa (who purposefully chooses the wrong one) selects. After drinking from it, he bursts into flames and dies. The knight quips, “He chose…poorly.”

Indy chooses an unassuming wooden chalice that would befit a carpenter and passes the test. He feels his injuries start to heal.

Indy goes back to pour water from the Grail on his dad’s wounds and they start to heal miraculously.

Elsa tries to grab the grail and leave, but a chasm opens beneath her. Indy tries to save her, but she falls to her death.

As the temple collapses, Indy, Henry, Brody and Sallah flee.

Resolution and Conclusion

Middle and End of Act 3

The final obstacle presented by the last plot twist is overcome, and the Hero moves on to the resolution, the climax of the story.

Not all resolutions occur as planned: the hero may foil the villain’s evil schemes; they may fail in their attempt to thwart the schemes; or they may negotiate an agreement with the villain.

No matter how the resolution occurs, the initial threat/problem is over by the end of this section.

Henry reflects as they leave that Elsa never really believed in the Grail, only seeing it as a prize. Indy asks what his dad found himself, and he replies, “Illumination.”

Indy’s dad calls him ‘Junior’ again (which he hates) and there’s banter and laughter about it as the men ride into the sunset, leaving the Grail behind in its resting place.

Outline Your Action-Adventure Epic

That’s the action-adventure beat sheet for Indiana Jones and the Last Crusade. Outline your own action epic with a free 30-day Plottr trial and comment your favorite line, scene or moment from this movie (or your own favorite adventure).

Table of Contents

Table of Contents

Start Your Free Trial of Plottr Today

Join thousands of writers who outline and organize their books and stories with Plottr.

2 thoughts on “Action-Adventure Beat Sheet: Indiana Jones and the Last Crusade”

    1. Jordan Kantey

      That’s a good one, Kurt 😆 Apparently Tom Stoppard was brought in to polish a lot of the dialogue (particularly between Indiana and his dad).

Leave a Reply

Your email address will not be published. Required fields are marked *