Ever wish you could see your story unfold before you write it? Storyboarding is like setting up a movie shoot for your book. It helps you picture each scene and spotlight key visuals and moments. Keep reading for 8 easy steps to create a storyboard for a book or script in Plottr.
What is Storyboarding?
New to storyboarding? It’s a simple way to outline your story by breaking it into visual panels that show key scenes, actions, and turning points.
Many creative industries use storyboarding:
- Film Directors use it to pre-visualize scenes, camera angles and shot composition
- Cinematographers and DPs use it to plan lighting setups, camera movement and shot continuity
- Writers and scriptwriters use it to ensure visual storytelling aligns with their scripts
- Animators use it to map out sequences, timing and character motion
- Comic book and graphic novel artists use it to plan early story development and layout before final illustration
- Game designers use it to plan the flow of gameplay, cinematic cut-scenes, and player perspective shifts
Storyboarding is a powerful tool to visualize your ideas. And Plottr is an effective storyboard creator. Some even say it’s easier to use than a storyboard.
8 Steps to Storyboard a Book in Plottr
In this Plottr storyboard tutorial, you’ll discover ways to:
- Make a timeline using your favorite story units.
- Add panel description fields to your storyboard template and save.
- Brainstorm and create a rough story outline.
- Sketch key scenes and add visuals to your project.
- Add a panel and short description to each scene card.
- Change the order of scenes and edit in Plan and Full Text view.
- Use tags and notes to sort and keep storyboards organized.
- Export or take screenshots of your storyboard to share or print.
Let’s explore in detail:
Make a Timeline Using Your Favorite Story units
Create a new Plottr file from the Dashboard. Start from a blank file, or use a starter template.
If starting from a plot template, create a plotline for your storyboard’s visual cards.
Change Chapter Headings to the Story Unit You Want
The timeline view in Plottr uses chapters as the default story units. You can create one storyboard panel per chapter, or use smaller units like scenes, beats, or shots instead.
- Beats: The smallest unit of structure, representing moments of action, emotion or decision
- Scenes: A sequence of shots that occur in place and time
- Shots: A single continuous view framed by a camera angle (a useful choice if you’re working on videos with shorter durations, e.g. content for your author page)
Whatever story units you want to use, here’s how to set them as column headers:
- Click Structure top right in the navigation ribbon.
- Under Name where it says ‘Chapter’, enter the unit you want to use (e.g. ‘Beat’).
- Press Enter or click away, then close the structure pop-up.
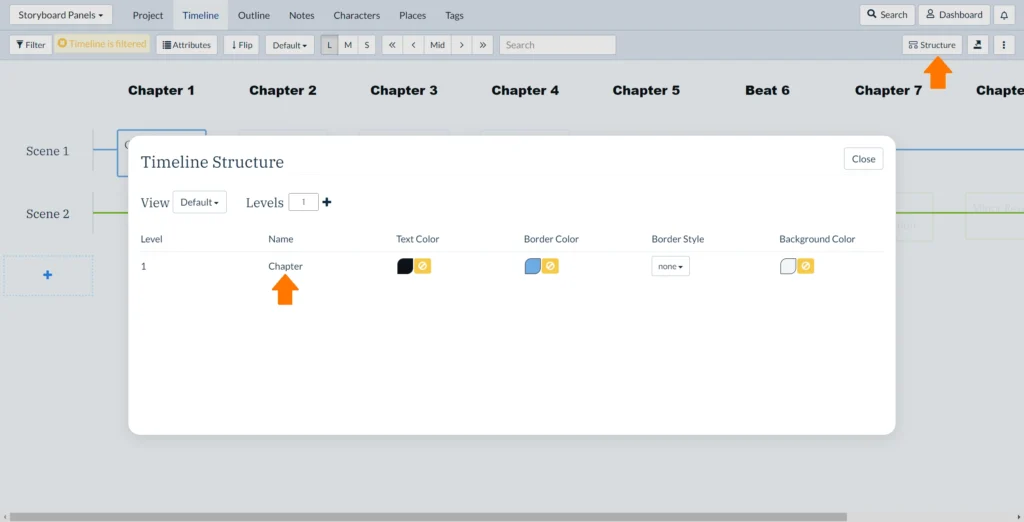
Your story unit names will now be different. You can make a scene card for each scene, beat or shot.
Add Panel Description Fields to Your Storyboard Template and Save
Step two is to set up each storyboard panel with text you can fill in later. Add a placeholder scene card on your main plotline and give it a name, like ‘Opening Shot.’
Click on your scene card to bring up the description area, and enter fields to fill out. For example, you could use these:
Place:
Time:
Tone and mood:
Key action:
Or, use any short, key info you want to track for each storyboard panel. Then, use Duplicate to make a few copies of the scene card to keep building your storyboard.
Close the scene card description editor and you’ll see your timeline, with your duplicated cards stacked.
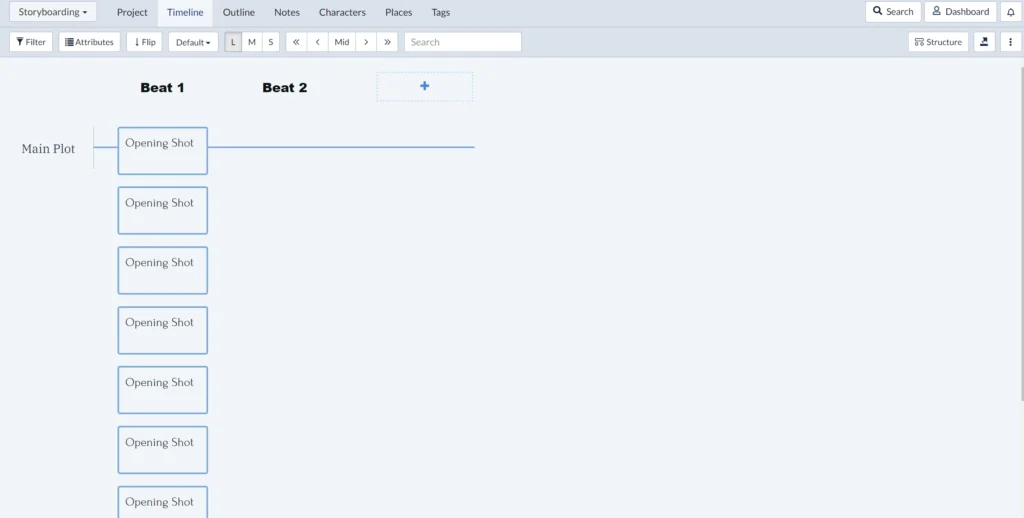
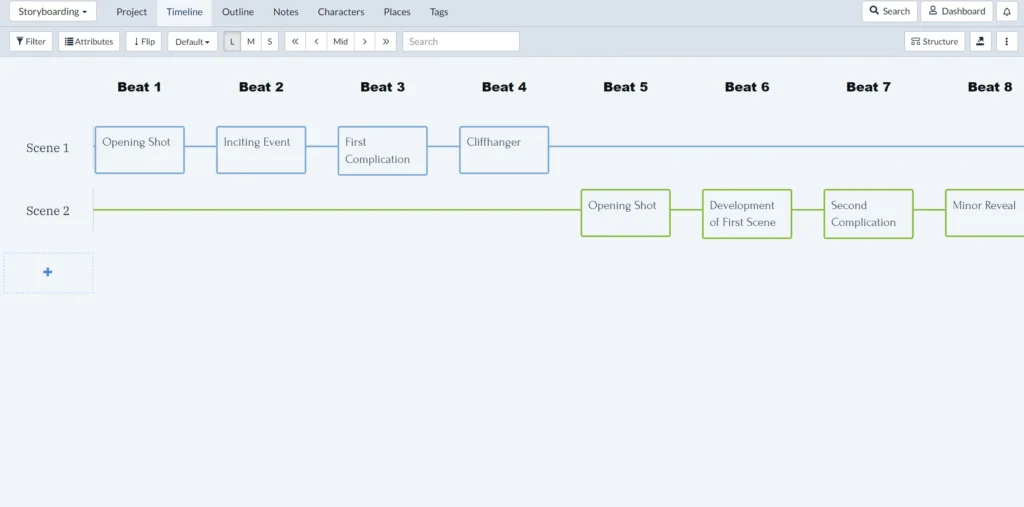
Drag these along to form a sequence along your plotline.
If you want, you can plan on multiple plotlines. Click on the name to rename your first plotline ‘Scene 1’, then add a second called ‘Scene 2’. This way, each new scene starts on its own plotline.
Once you have a structure you like, save it as a template you can keep using.
How to Save Your Self-Made Storyboard Template
While in the Timeline view, click the three dots in the top-right corner and choose Save as Template. Name it something like ‘Storyboard Template,’ then click Save.
You can now start from this custom template from the dashboard (find it under Create from Template > My Templates).
Brainstorm and Create a Rough Story Outline
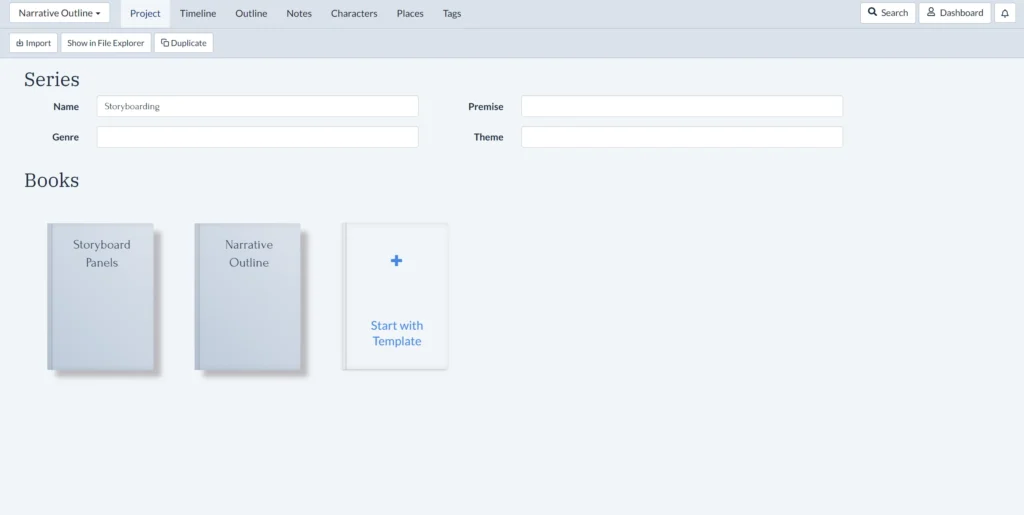
This is where Plottr’s flexibility shines. You can brainstorm your main plot right in the same timeline as your storyboard panels — or switch to the Project view to create a new ‘Book’ for doing text- (rather than visual-) based outlining.
Your Project view could then look like this, with one ‘book’ for your storyboard sketches, and another for ideas and notes that rough out your main plotline.
Use Plottr’s built-in plot templates to kickstart brainstorming. Or, if you already have a story in mind, begin a loose summary of scene ideas.
Storyboard Example: Brainstorming a Murder Mystery
Let’s say we have these loose ideas for the first few beats of a murder mystery:
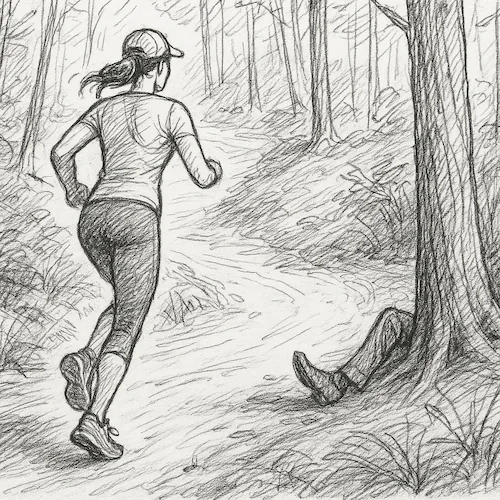
Beat 1: Opening Scene
Visual: A woman in athletic gear runs downhill on a wooded trail. We see her from behind as she slows… part of a human leg is sticking out from behind a tree.
Mood: Unease creeping in.
Beat 2: Inciting Event
Visual: Close-up: the woman snaps a photo of the body with her phone, expression tense but composed. Cut to a low angle through the bushes: a shadowy figure is watching her, raising their own phone.
Mood: A double mystery begins: Who’s dead, and who’s watching
Beat 3: First Complication
Visual: The woman approaches a small ranger station near the parking lot, breathless. The bored guard barely looks up from his tablet, dismissively waves her off saying that it’s the police’s job to investigate.
Mood: Exasperation, and a little uncertainty. Could the ranger be complicit?
We could describe these moments in the ‘Narrative Outline’ section we’ve made in our Plottr project.
Sketch Key Scenes and Add Visuals to Your Project
If you’re not a visual artist genAI could be a helpful brainstorming partner for visuals.
For example, for the first beat above, you could write a prompt like this:
‘Create a loose, gestural pen line drawing of a woman in athletic gear running downhill on a wooded trail. The camera’s POV is behind her, and ahead of her, a leg sticks out from behind a tree, positioned so that whoever’s body it is lies face down or in an awkward position that does not suggest rest but their demise, something more sinister.’
This approach can help you notice what you hadn’t specified about your shot and refine ideas further. For example, the distance between figures and elements in the scene, what a character is wearing, their line of sight or pose, and so on.
This is where storyboarding helps you really refine your concept of the mise en scene or tableau in every scene. That in turn will help you get inside your character’s heads.
You might also want to use a more advanced image tool that lets you set the aspect ratio.
In Freepik, for example, you can sketch out a panel’s layout to brainstorm. This helps you plan the scene and try out different versions and revisions quicker.
If you don’t like using generative AI, or want to practice sketching yourself, you could use stock image libraries for layout and element design inspiration. Unsplash is one useful resource for free images and textures.
Add a Panel and Short Description to Each Scene Card
Plottr is convenient as a simple storyboard creator because:
- Drag and drop scene cards in the Timeline view can be used to store and move around panels
- You can save an image or storyboard panel to each scene card and hover over the card in your timeline to preview that card
Take your storyboard drawings and insert the relevant drawing for each scene card. Here’s how to do that:
- Open up the scene card for which you want to add a panel.
- Place your cursor where you want to insert the image (below the description text you’ve added is good). Then click the media icon (second-last button in the row above the description box).
- In the view that opens, you can either insert a panel you’ve already uploaded to Plottr from your media library, or upload an image, or insert directly from a URL.
- Once you’ve selected the drawing for your storyboard panel, click Choose.
Now, when you hover over that scene card, you’ll see the storyboard panel with your description template you’ve filled out plus the image.
Repeat this process for each of your scene cards.
Change the Order of Scenes and Edit in Plan and Full Text View
There are further tools to help you storyboard in Plottr.
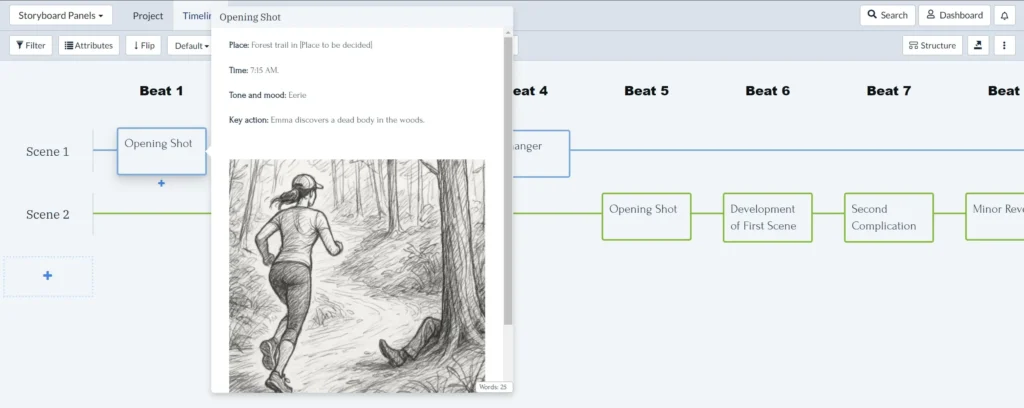
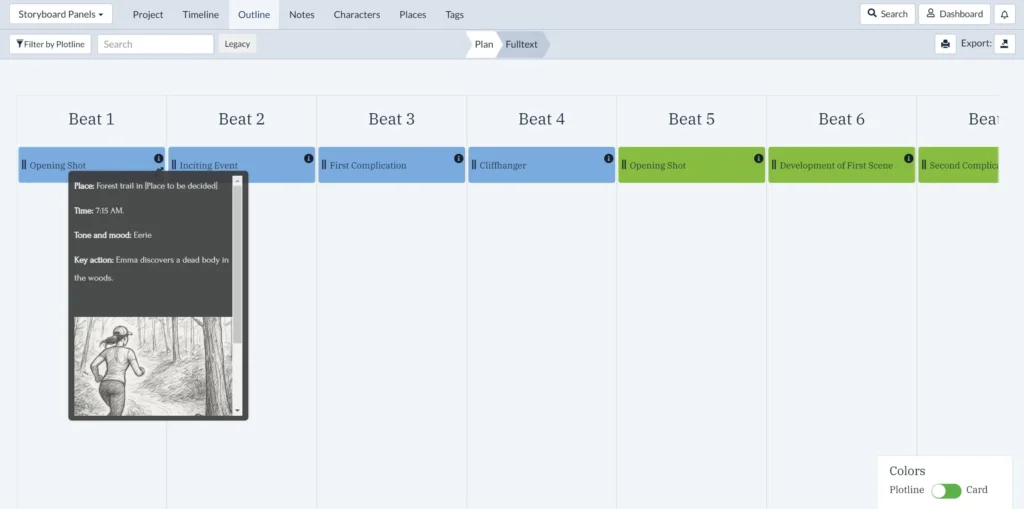
In the ribbon, click Outline to switch to the outline view. In the Plan section, you can move events around more easily and change their order within each story unit.
This is useful if you’re stacking multiple cards per unit (say, for example, multiple scene cards per chapter) and want to rearrange their sequence. Hover over the (i) info icon to see the storyboard panels you’ve added.
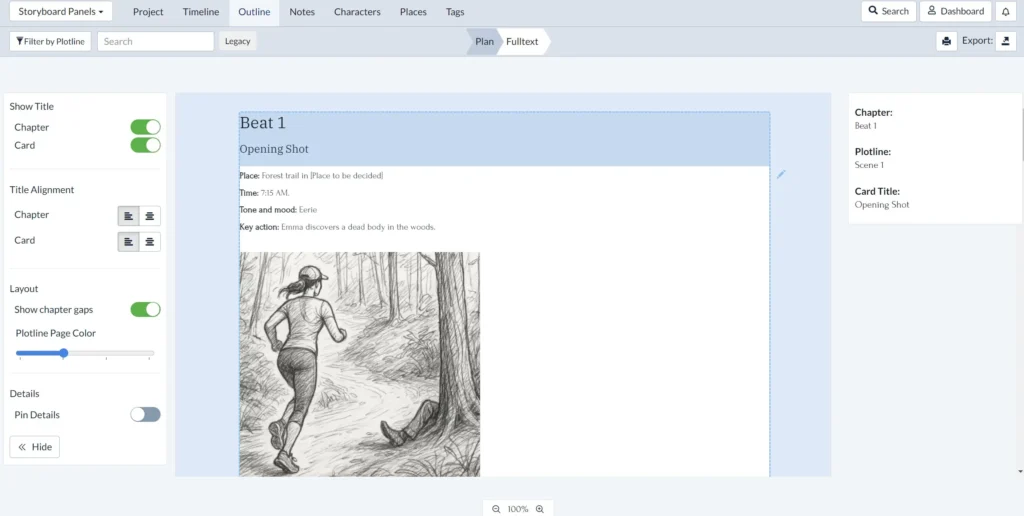
In the Full Text tab within the outline view, you can quickly edit or replace each panel’s title, description, image and other details. Simply click the pencil icon next to the description area, then anywhere outside of the page area when done.
Use Tags and Notes to Sort and Keep Storyboards Organized
Using Plottr as a storyboard creator gives further useful tools: tags and filters. How can you use them?
Tag Storyboard Panels Any Way You Like
The Tags view makes it easy to create custom categories of color-coded tags (such as themes or tension level). Learn more about how to use tagging in Plottr.
Filter Your Storyboard by Story Data
Once you assign tags, places, characters and colors to scene cards (representing your storyboard panels), you can filter them to focus on specific elements. Here’s how:
- Click Filter top left
- Click a checkbox for the element you want to view. An eye icon will appear in the checkbox showing your filter is selected.
- At any time, click the box that says Timeline is filtered to remove all filters.
Export or Take Screenshots of Your Storyboard to Share or Print
You can print your storyboard to paper or PDF from the Full Text tab in the Outline view.
Print with card and beat (or other story unit) titles toggled on or off, and with or without gaps between story sections (using the controls to the left of the page).
Want to snapshot individual Full Text pages as they appear on screen and import them to other storyboarding software or a free storyboarding template?
Click View in the top navigation bar, then Take Screenshot. Then save your image file.
If you want to use your screenshot in a free visual template with a different layout, you can find many on Canva.
Plan Visually and Create Detailed Storyboards
Ready to create a storyboard for a book or script? Start now with a free Plottr trial.
Do you take a visuals-first approach to outlining? What’s your process? Comment and share it below!
FAQ
No, but you can use Plottr split-screen or on a multi-monitor setup with your favorite software for sketching panels (many writers use Plottr and Scrivener that way).
Not yet, but you can use the steps described above to create your own.

Comments