Scenes fall into two main categories: proactive and reactive. Both are essential for a believable and vivid sense of cause and effect. Let’s see how Plottr’s Reactive Scene template can help you to lay the groundwork for a solid story.
What is a Reactive Scene?
A reactive scene is based on the familiar concept of “scene and sequel,” a classic approach to story structure that breaks down scenes into either “active” or “reactive” types.
An active or proactive scene (learn more here) is composed of a series of actions a character takes to achieve a goal. The scene that follows one of these is termed “reactive” because it depicts a character’s reaction to what has just happened.
Not every active scene requires an immediate reactive follow-up. Yet if you wait too long between active and reactive scenes, the pacing and sense of connection may feel disjointed. That makes it difficult for your reader to really engage with the story and see not just the action of your plot, but its continuous impact on your characters.
Scene structure has a lot of moving parts that can leave you feeling a bit overwhelmed at first. Since your story’s success hinges on your ability to write effective scenes, it’s a vital skill to hone. Take your time! You can start with this helpful article on Fictionary, which does a great job describing the basic elements of all scenes.
Three Ways to Use the Reactive Scene Template to Improve Your Writing
Without reactive scenes, your readers might not understand what your characters think or feel about the challenges, obstacles, and events they encounter. Your story would become nothing but a non-stop list of events that happen to your characters.
The great thing about using Plottr’s Reactive Scene template to plan your story is that it works for every type of writer, and every stage of writing.
Here’s what we mean:
1. Balance Proactive Scenes with Emotional Response
Thinking of scenes in these pairings will help you make sure each active scene is balanced by time spent diving into your characters’ feelings, and the changes they’re experiencing, from start to finish in your story.
Maybe you write a scene where your hero is dumped by his long-time girlfriend. How does he feel about it? Is he crushed, bewildered, angry, relieved … or something else? Without a reactive scene there’s no way to tell, so your reader won’t know how to feel. Striking this balance will deepen characterization and keep readers engaged.
2. Use It to Connect Scenes (Whether You Plot a Lot or a Little)
Thinking in terms of proactive and reactive can suit detail-driven plotters as well as “pantsers” who prefer to do very little preparatory plotting. Do you shy away from outlining and prefer to just get writing? No problem; just use the template to sketch out your scenes, casually connecting one to another.
On the other hand, maybe you’re a die-hard plotter who wouldn’t dream of writing anything without a detailed outline. That’s great, too. Feel free to flesh out the template as much as you like. Some writers include detailed descriptions of setting, character thoughts, motivations, and even passages of dialogue.
3. Use the Reactive Scene Template to Guide Revision
This template is especially helpful after you’ve completed your rough draft. Take time to carefully review what you’ve written, making sure each reactive scene reveals what your character is thinking and feeling, thereby pulling your reader ever deeper into your tale.
Which scene elements do you need to add in order to accomplish that? Where do you see opportunities to improve your pacing?
Introducing the Reactive Scene Template in Plottr
Once you decide which character will be your main focus in a particular scene, Plottr’s Reactive Scene template will guide you as to the type of reaction, ensuing dilemma, and final decision you’ll need to create in order to make that character’s thoughts, internal struggles, and motivations clear to the reader.
Here are the components of the Reactive Scene template in Plottr:
- Reaction
How does the character respond to the setback in the previous scene? - Dilemma
What choices does the character have to respond to their setback? Where will each choice lead? - Decision
What does the character decide to do in regard to their setbacks?
Example Using the Reactive Scene Template in Plottr
The Reactive Scene template in Plottr consists of three core elements: Reaction, Dilemma, and Decision.
To illustrate, let’s explore an example.
You may be familiar with O. Henry’s classic and endearing short story, “The Gift of the Magi.” It’s about a young married couple, Della and Jim, who are poor and living in a small apartment in the early 1900s. As Christmas approaches they both very much want to buy a special gift for each other. In one of the “active” early scenes, Della realizes she only has $1.87 to spend. The following scene is the “reactive” answer to that action.
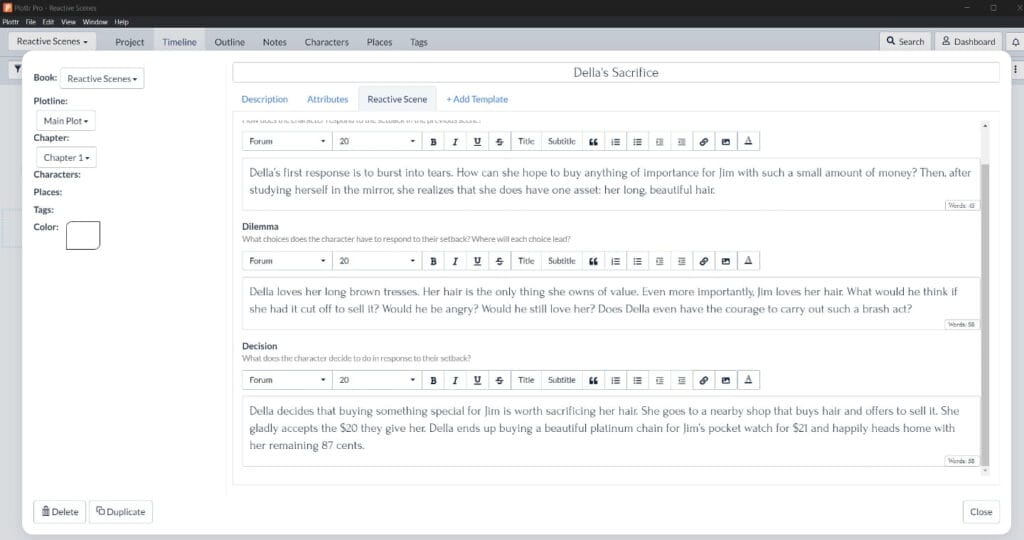
Reaction
Della’s first response is to burst into tears. How can she hope to buy anything of importance for Jim with such a small amount of money? Then, after studying herself in the mirror, she realizes that she does have one asset: her beautiful hair.
Dilemma
Della loves her long brown tresses. Her hair is the only thing she owns of value. Even more importantly, Jim loves her hair. What would he think if she had it cut off to sell it? Would he be angry? Would he still love her? Does Della even have the courage to carry out such a brash act?
Decision
Della decides that buying something special for Jim is worth sacrificing her hair. She goes to a nearby shop that buys hair and offers to sell it. She gladly accepts the $20 they give her. Della ends up buying a beautiful platinum chain for Jim’s pocket watch for $21 and happily heads home with her remaining 87 cents.
(No spoilers here, but if you’ve never read “The Gift of the Magi,” make sure you do. It’s the twist ending that makes it such a classic.)
How to Use the Reactive Scene Template in Plottr
If this sounds like a helpful device for building your own scenes and stories, you’re in luck: with Plottr, incorporating the Reactive Scene Template into your outline is easy. First, get started with a free 30-day Plottr trial. Or see membership plans and pricing.
Once you have Plottr setup on your computer, just follow these five steps to add the Reactive Scene Template to your scene card:
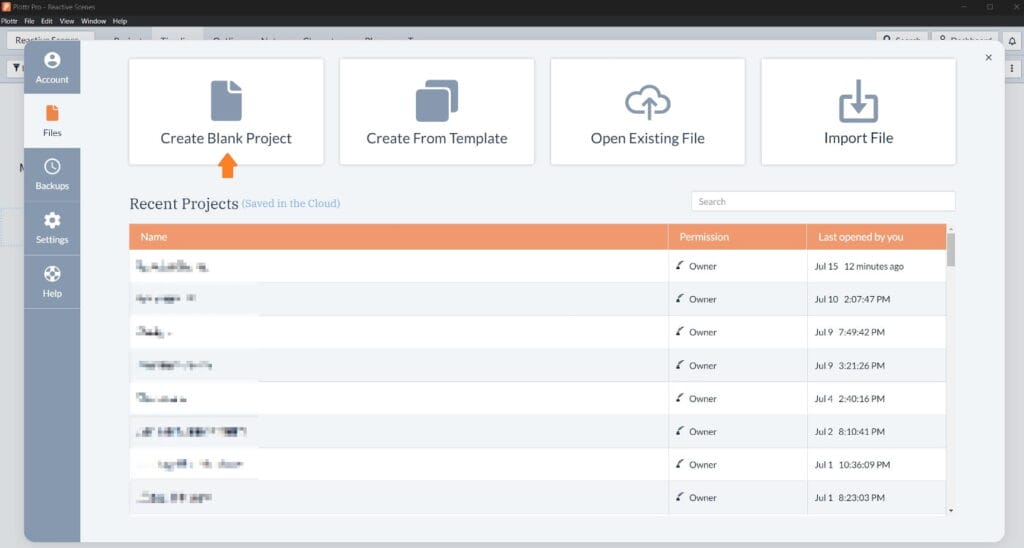
- Step 1: Open Plottr and in the Files tab, click Create Blank Project (or open an existing project file)
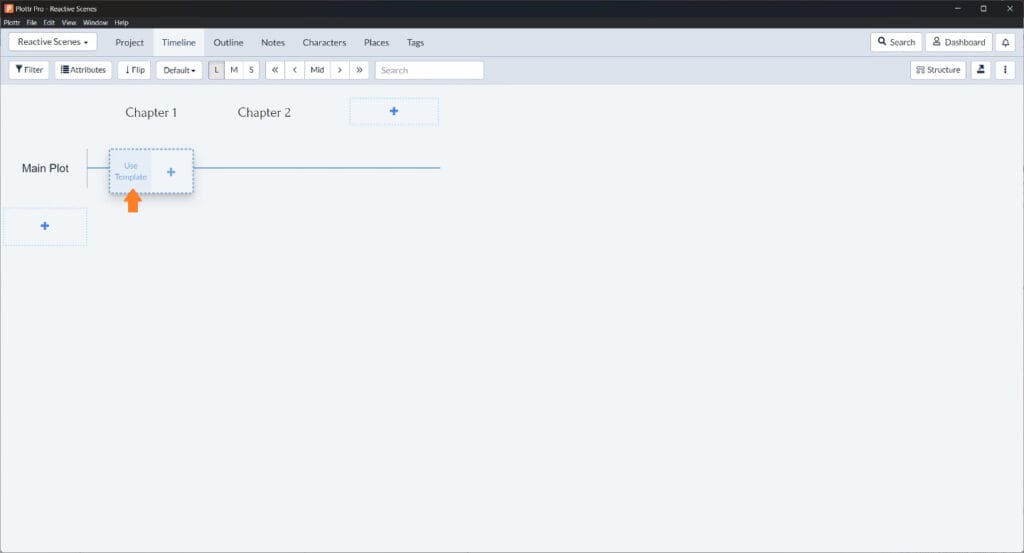
- Step 2: Hover over the plotline where you want to add a scene card and click Use Template in the box that appears
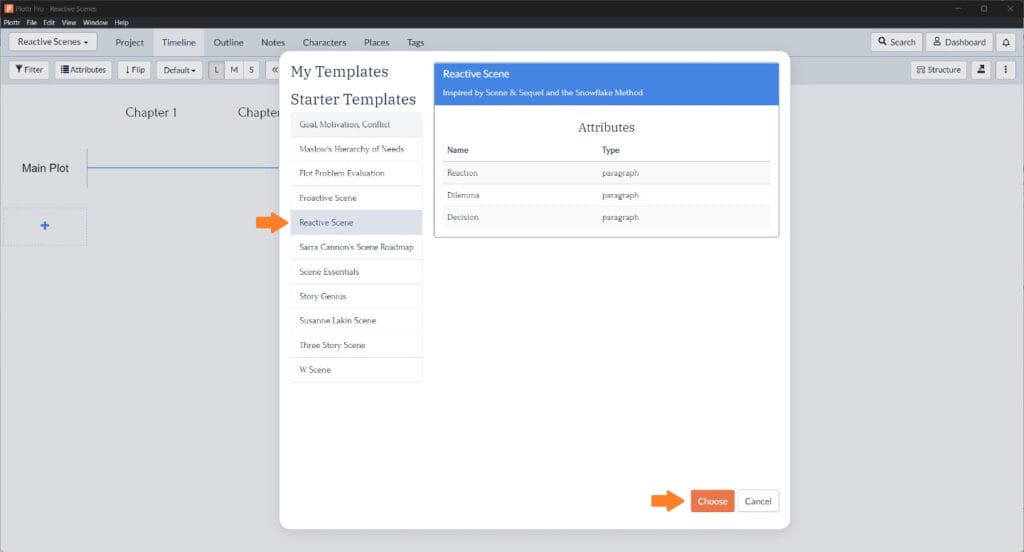
- Step 3: Select Reactive Scene from the list of scene templates and click Choose to add it to your scene card
- Step 4: Name the scene card and press Enter to save it
- Step 5: Open the card and start filling out the template!

You can also add a template to an existing scene card by clicking the +Add Template button within the editor, much like you would for a character profile.
Try these other scene templates in Plottr:
Start Building a Chain Reaction for Your Plot
Plottr’s scene templates will help you build chains of proactive action and reactive response in your story. Start now with a free trial of Plottr, and let us know your favorite templates in the comments section.

Comments